RUGS - TIPS AND TRICKS
WORKING THE RUG
Work your rug so that the completed rows will be closest to you and the unworked canvas further away. That's because it's much easier to latch-hook in that direction. For most of us, when working picture rugs, that means working from the bottom-up. It's important to stick to one method so that the knots all face the same direction - otherwise, as the rug wears, the knots will settle unevenly and leave gaps in the rug. Apart from that, we all develop our favourtie techniques. Some like to work in strict rows from one side to the other. I like to work in blocks of about 10 rows by 20 squares. When I get to an intricate area, I tend to work that area as a block. Every so often, it's a good idea to turn the rug over and check for missed knots. The thing to avoid is filling in one colour at a time on the canvas - not only will this get fiddly, there is a likelihood of missing squares or pulling the canvas out of shape as you struggle to fit a knot into a gap.
With an intricate pattern, especially when working from a chart, it’s sometimes necessary to finish a section of pattern (so you don’t lose your place) and fill in around it. Afterwards, turn the rug over and check the underside to see if you’ve missed any knots.
The most common reason people discard a rug project is because they do the pattern then try to fill in the background afterwards. It’s fiddly to latch-hook around worked areas and novices can get discouraged. If the background is a single shade, it's also boring. Where need to fill in large areas of a single shade, work it a 10 x 10 square at a time instead of long rows - you'll see your progress more easily. I amuse myself by latch-hooking waves or triangles instead of a straight line, and then filling the gaps.
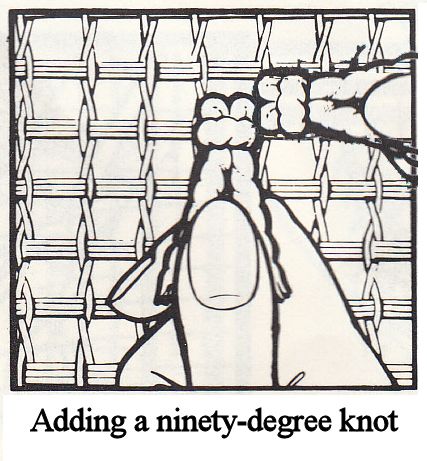
To give better definition to the small details, you can add extra knots at 90 degrees.
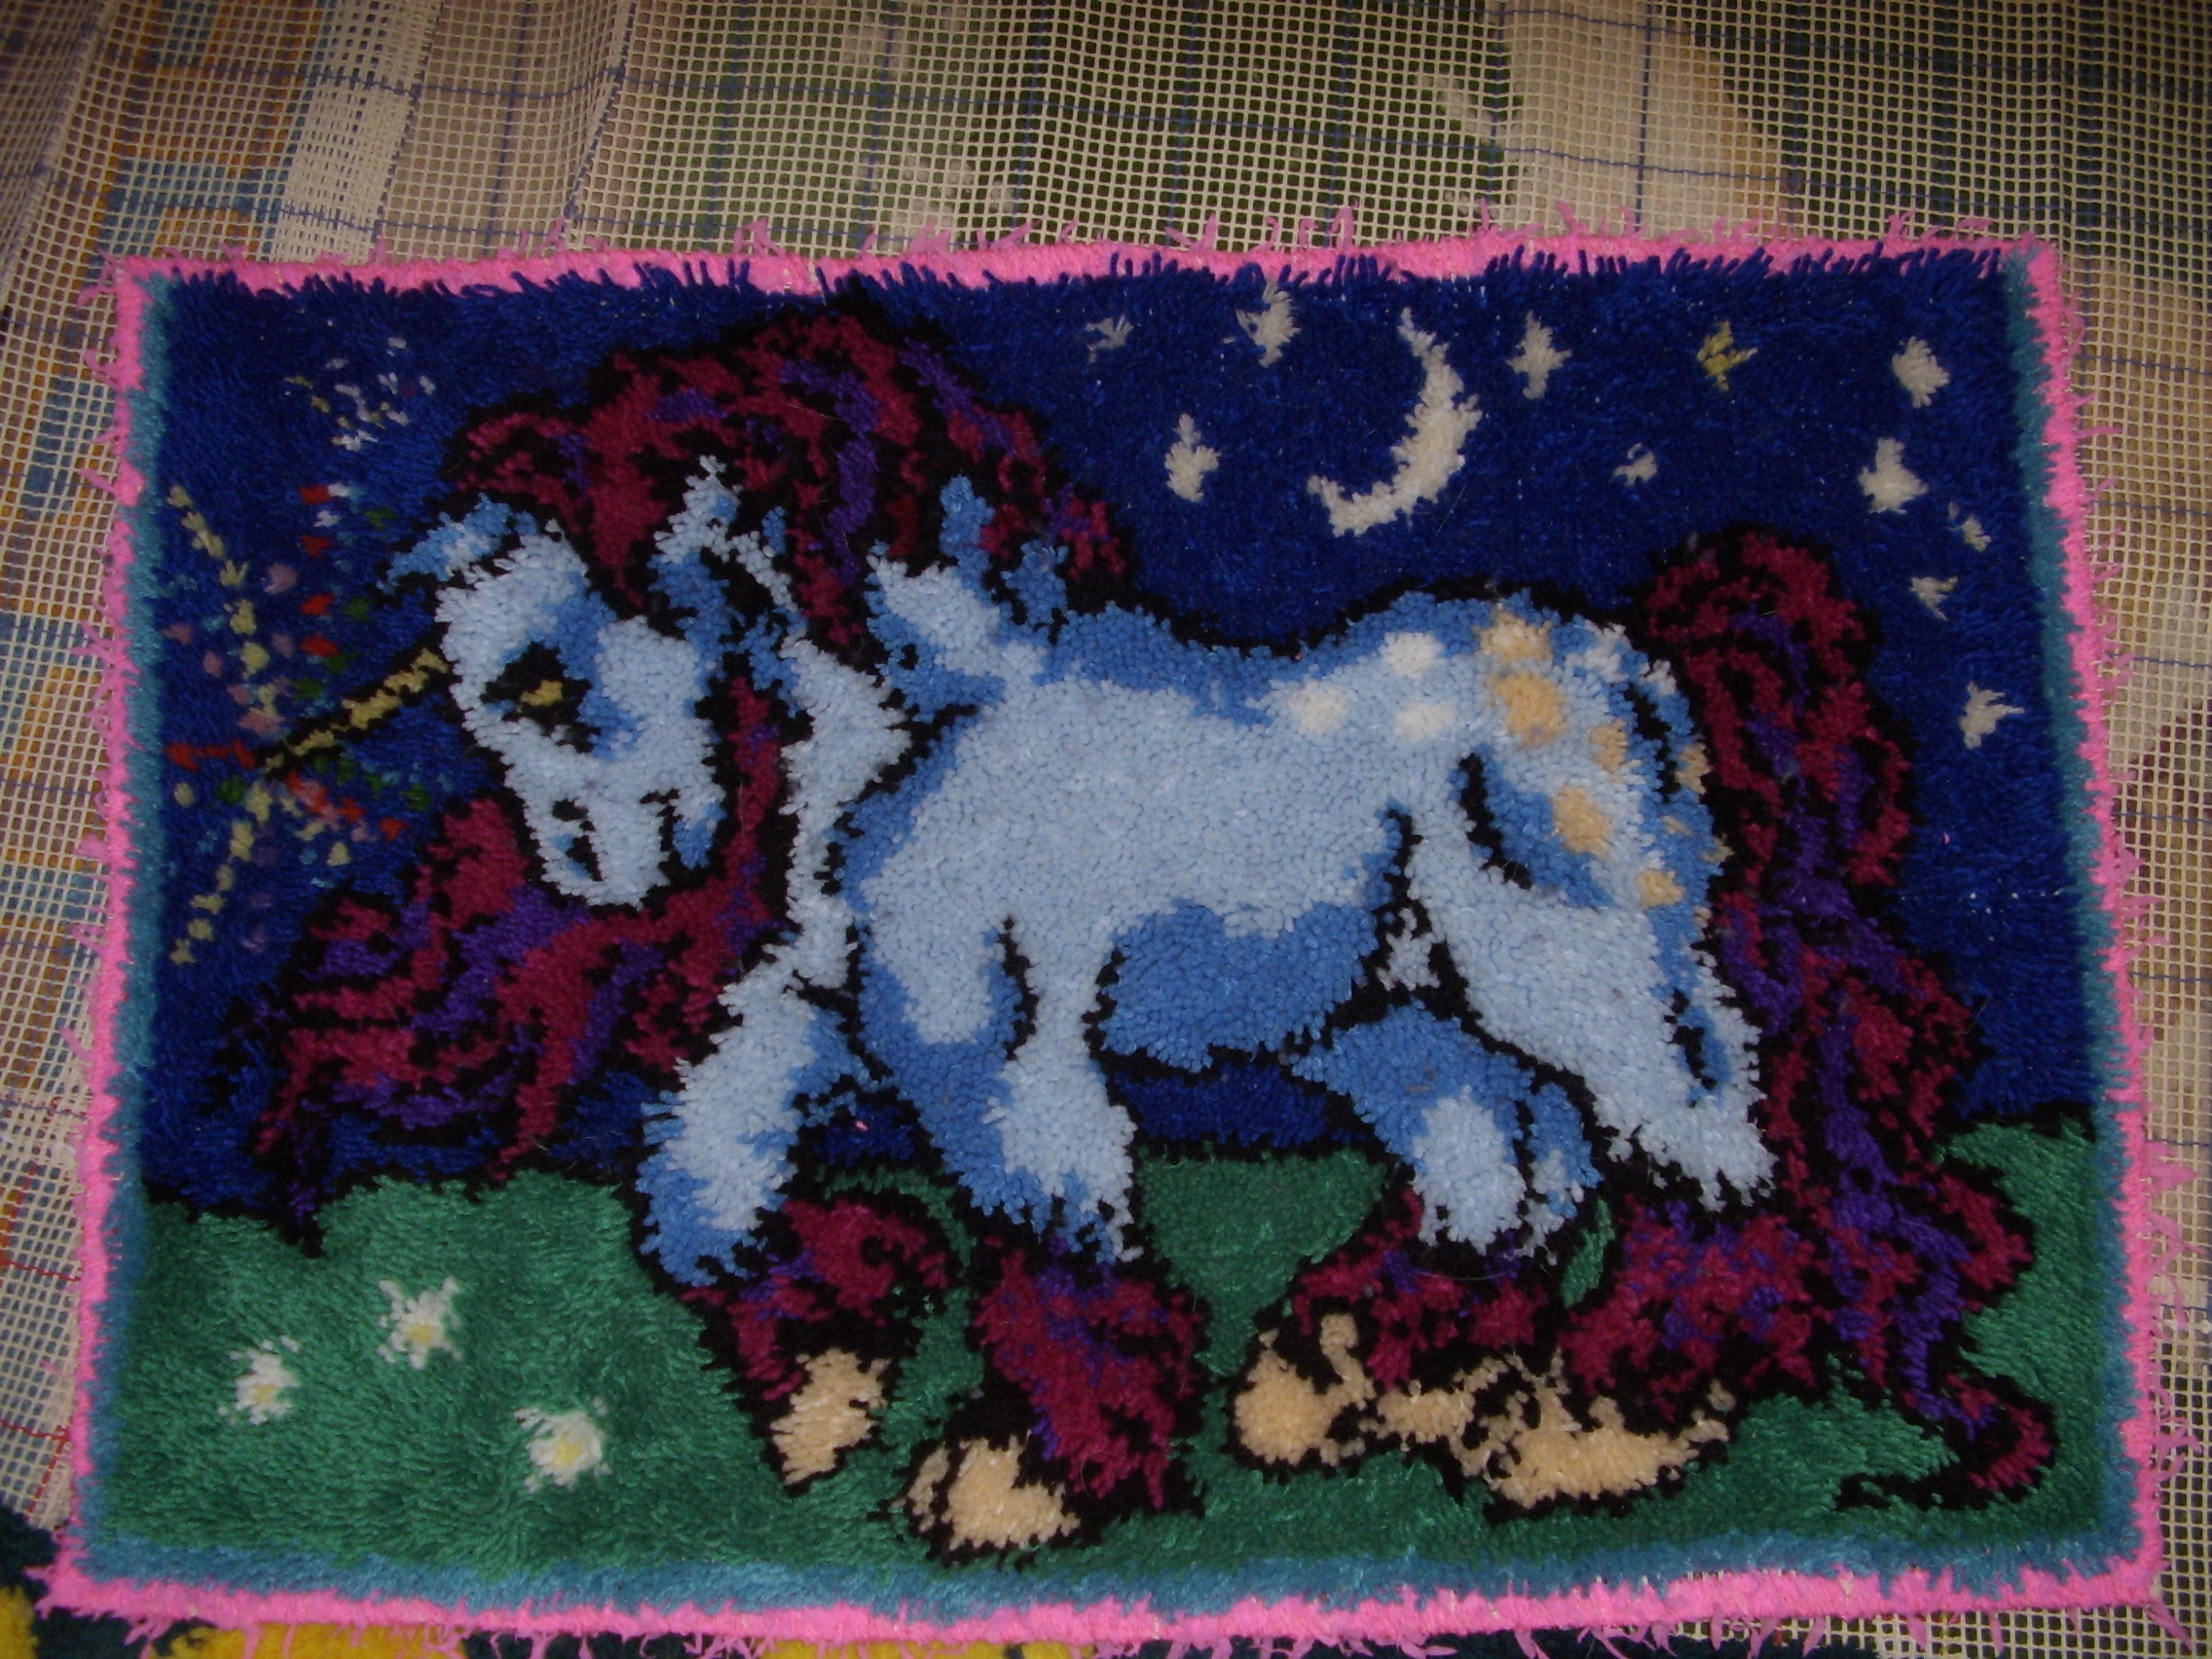
When buying a pre-printed canvas with a traditional pattern (or using a cross-stitch chart), you don't have to stick to the colour scheme provided. If the canvas is printed in browns and you want to do the pattern in greens, it's your choice. Keep a conversion chart handy and the darkness/lightness of hue. My floral rugs rarely used the charted colours - red poppies became golden poppies. Don't be afraid to customise a kit! I customised the cutesy unicorn rug for a friend's daughter by adding daisies, stars, comets etc to the background and I gave the unicorn a more smiley expression. I used oddments of yarn from charity shops and other projects to add the extras.
|
HEMMING AND BINDING EDGES
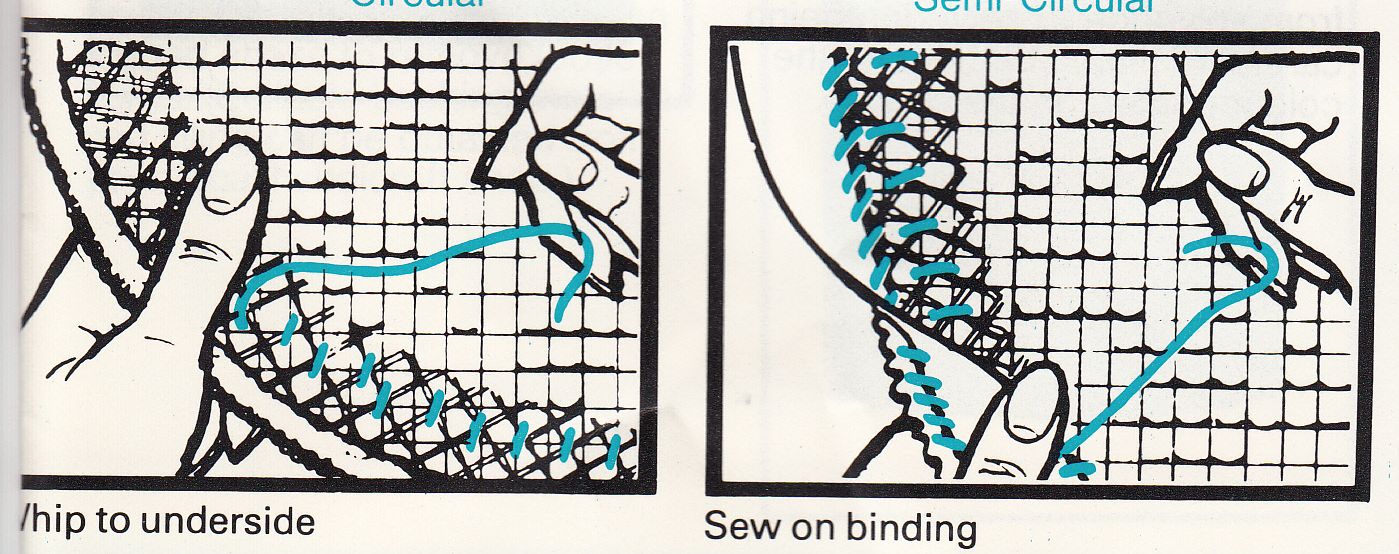
The turned edges and the woven edges (selvedge) of a canvas can be hidden by over-stitching with yarn; I prefer this method to rug-binding as it gives me a wider choice of edging colours. I edged the cutesy unicorn rug with lurid pink fancy yarn for my friend's daughter. Skeins of uncut rug wool and balls of "whipping wool" are sold for this purpose.
LATCH HOOK CHARTS, TAPESTRY CHARTS AND CROSS-STITCH CHARTS
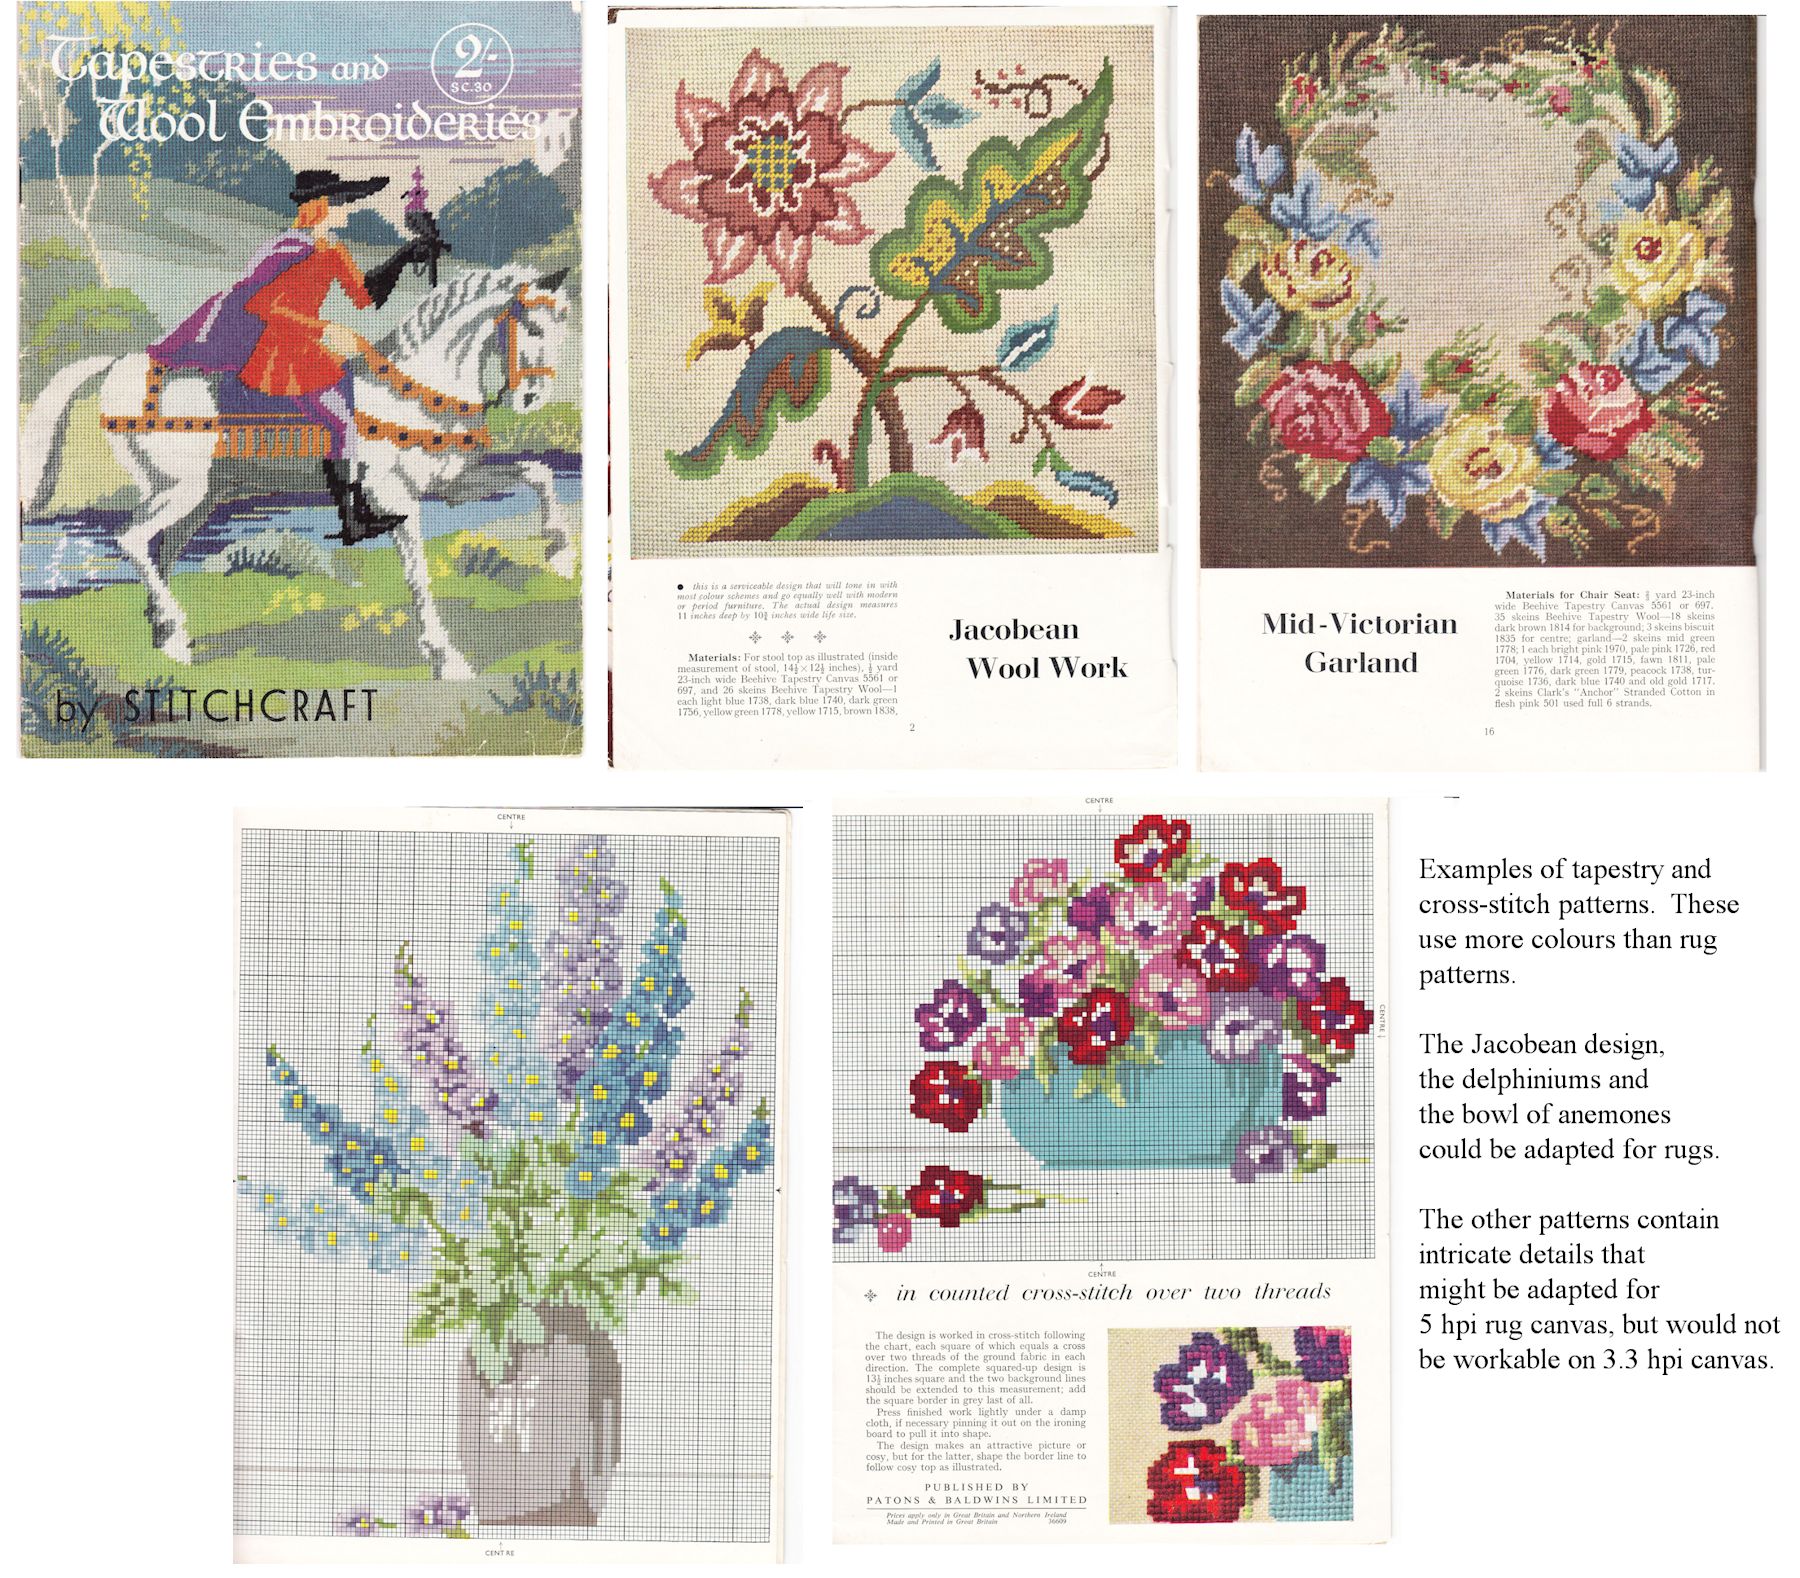
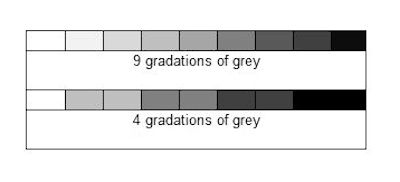
These all use a basic squared grid for laying out areas of colour onto a canvas. On the face of it, they look interchangeable, but if you look closely you’ll see that rug charts far fewer colours than cross-stitch or tapestry charts and there’s a good reason for this. Cross-stitch and tapestry are flat (don’t have a pile) which means the colour boundaries are crisp and even a tiny area of colour is well-defined. You can use the different shades like you’d use paint – subtle tones, light and shade etc. Rugs have a pile, which blurs the colour boundaries so that tiny areas of colour get lost in the mix. Rug designs are less subtle than other needlepoint designs and use fewer colours. It’s not uncommon for a cross-stitch or tapestry design to use 25 or more colours whereas rug designs usually have between 4 and 12 colours. Historical rug wool suppliers had a range of around 50 shades, while modern suppliers Anchor and Iriss each have around 75 shades. That sounds a lot, but unlike tapestry wool or embroidery floss, these don’t cover subtle nuances of hue. Latch-hooked pictures may need to adopt a more naïve (sometimes known as primitive) style.
As a simple example, look at the difference between the 9 shades (white + black + 7 intermediate shades) that you might see on a tapestry or cross stitch; the result can be almost photographic. In comparison, rug wool offers white + black + 3 intermediate shades = 5 shades. I know this from designing my monochrome lynx-face rug. If you want to use a cross-stitch/tapestry chart for your rug, you’ll probably need to simplify the colours.
|
In some cases, it’s possible to give the impression of an intermediate shade by unpicking a 6-ply strand of yarn from each adjoining colour and making 2 new strands with a mix of each colour. This is effective when viewed from a distance. Unpicking strands is time-consuming and it’s simpler to just limit the number of colours on the design. (This is the only time when I find thin acrylic rug yarn useful – you need at least 4 strands to get a decent thickness for a tuft, and you mix strands easily).
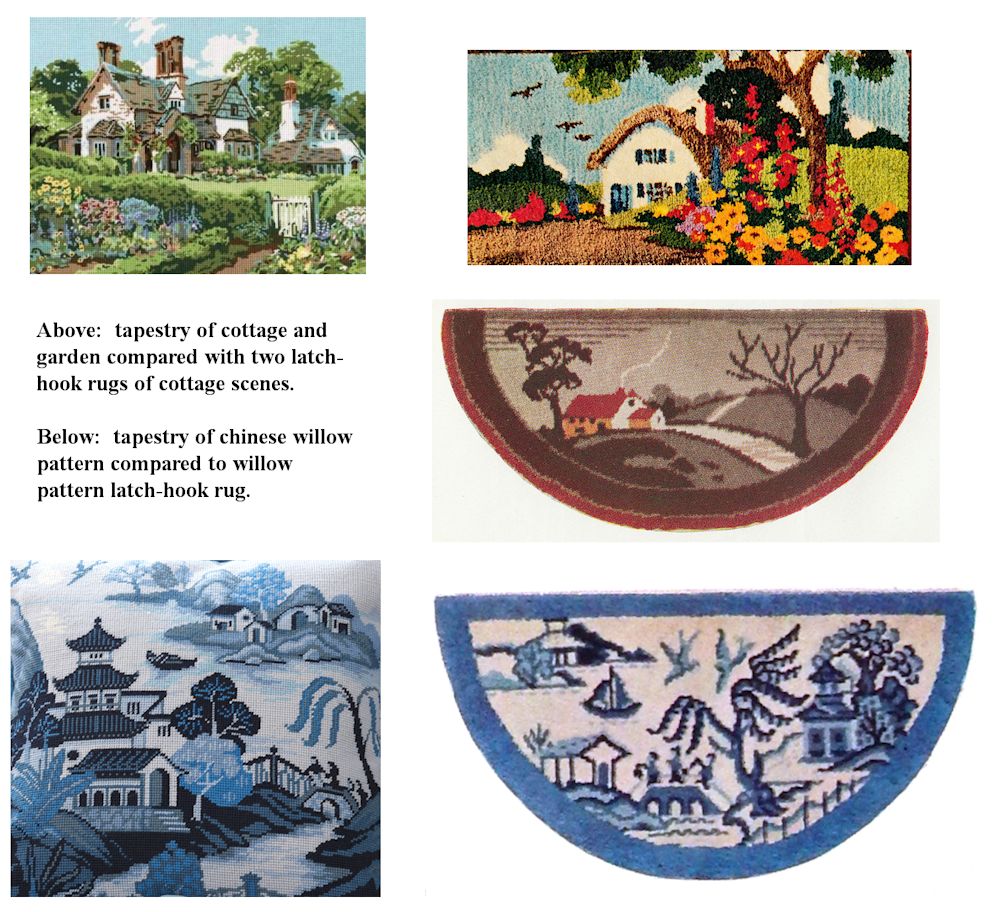
There is software that converts photos into cross-stitch charts, but not into the limited colour ranges suitable for latch-hooking. A lot of downloadable charts claim they are also suitable for latch-hooking, but they are usually far too intricate in terms of pattern and hue for a pile rug. The end result will probably be disappointing. Before buying a tapestry/cross-stitch chart that is "also suitable for latch hooking" count the number of colours and look at the pattern. If the pattern is highly detailed or uses more than 12 shades then it’s unlikely to make a good rug pattern. If the pattern is simple and bold, then it’s worth a try. The difference between tapestry/needlepoint designs and rug designs is illustrated by these photos.
|
|
|
|
CALCULATING CANVAS SIZE FROM A CROSS STITCH CHART
If, after reading the cautionary notes above, you are converting a charted needlepoint pattern for a rug project, remember the size difference. To work out your canvas size, count the stitches and multiply by hpi then add a bit to each cut edge for turning over.
A pattern 100 stitches wide worked on 3.3 hpi canvas will turn out 100 / 3.3 = 30.3 inches wide.
Add another 10 holes (3.3 inches) to each cut edge for turning over.
You'll need a canvas 30.3 + 3.3 + 3.3 = 36.9 inches wide.
Repeat for length.
For 3.75 hpi, you need a minimum of 26.6 inches wide (not including turnovers).
For 5 hpi, you need a minimum of 20 inches wide (not including turnovers).
It's best to stick to patterns that fit within the woven edges of the canvas unless you are willing to join two or more lengths of canvas together.
CHARTED DESIGNS VS PRINTED CANVASES
Many companies now produce charted designs instead of stencilled canvases. Charts have the advantage that they are more precise than a printed canvas. These days, most charts are in colour, though this can be a problem when some colours are very similar to each other. Black-and-white charts use different symbols for each colour and you have to remember which symbol denotes which colour. So neither method is perfect. It's worth learning how to interpret black-and-white symbol charts if you're reproducing designs from old Patons or Sirdar magazines.
Although the charts are similar to cross-stitch or tapestry charts, the pile of the rug means the design won't be as crisp or detailed as cross-stitch. If you're adapting a cross-stitch/tapestry design for a rug, it's best to simplify intricately detailed areas: these look great in cross stitch, but look muddled on a latch-hooked rug. You'll probably need to reduce the number of colours because knotted rugs can't match the subtleties of tapestry. This is why generating a rug pattern from a photo is rarely satisfactory. These limitations are the reason a good rug catalogue has photos of the finished rugs, not just the charts. On the other hand, unlike cross-stitch patterns, you can vary the depth or thickness of pile on your rug to create a sculpted effect.
The older pattern magazines give wool quantities by weight rather than by pieces or by number of cut-packs. Because weight depends on thickness of the wool this isn't a straight conversion. Roughly counting the number of holes in each colour will help. I tend to over-buy rather than under-buy - leftover wool can always be used in another project. While the exact shade probably won't be available any longer, both Iriss and Anchor have a wide enough range that you'll find a suitable alternative.
I’ve scanned and transcribed a lot of historical rug patterns which are now on Flickr. You’ll find plenty of other historical rug charts are on sale at Bonanza and Etsy.
USING EXCEL TO GENERATE RUG CHARTS
I've tried a number of programmes that claim to create charted patterns from photographs, but the results have always been disappointing. The programmes didn’t preserve the clear lines of simple patterns with limited colours. I then found that MS Excel could be used to create charts – basically I had electronic graph paper. When transcribing the pattern of a vintage rug into a chart, use the back of the rug as a guide. The colours and pattern will be better defined. I usually represent black areas as charcoal grey – that way the grid is still visible. A key to colours (or to alternative colours) may be useful. Because yarn suppliers’ ranges change over the years, I use generic names e.g. pigeon grey, sky blue.
1. Adjust the cell size to squares and set them to have thin borders. This creates the electronic graph paper.
2. Use the fill tool to colour in squares and create the pattern. It can be time consuming, but it's easy to edit.
Tip 1: Cut and paste and "paste-transpose" is useful when creating borders and corners.
Tip 2: To create a mirror image of several rows:
(a) select the rows you want to mirror.
(b) copy them to blank rows of the worksheet below the pattern you're working on.
(c) insert a column of extra cells to the left of the pasted section. Number these cells in ascending order.
(d) select the numbered rows and "sort descending".
You now have a mirror image that can be cut and pasted onto the pattern.
Using a combination of "transpose" to rotate the pattern, and "sort" to create mirror images, I've quickly completed geometric rug patterns during a lunchtime.
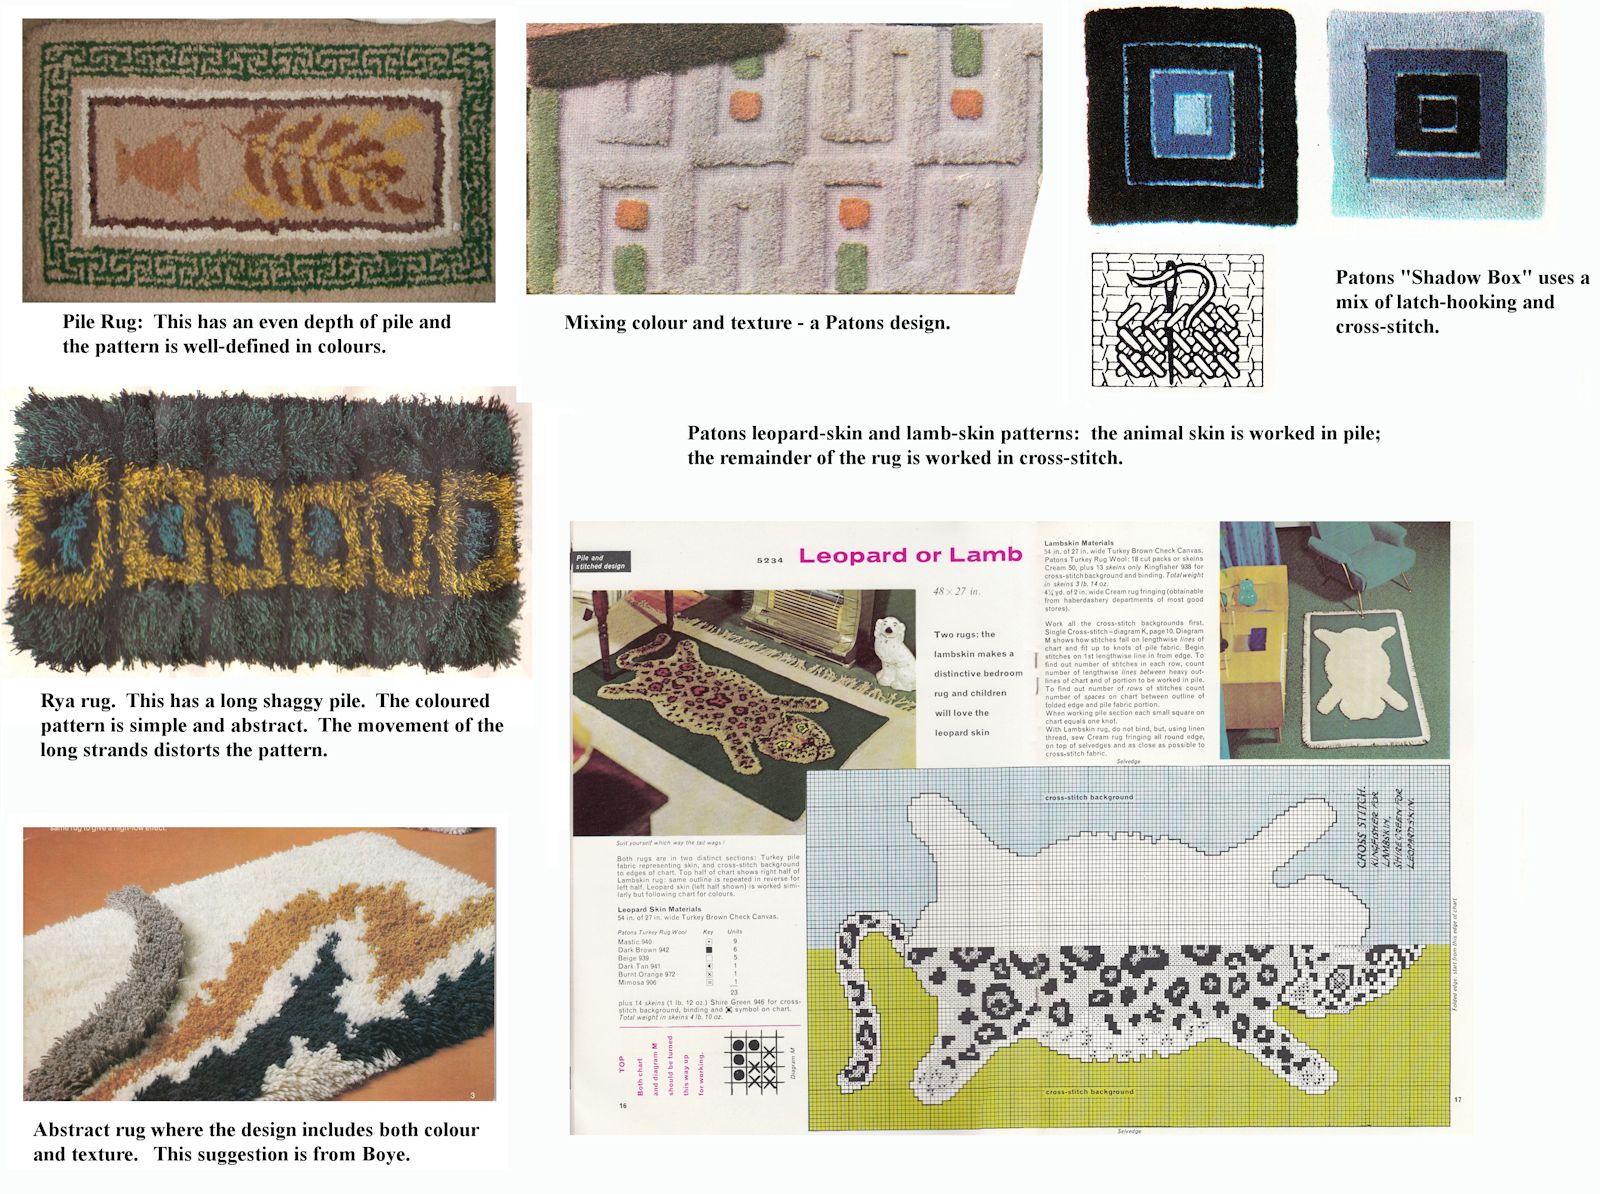
MIXING TEXTURES
Although latch-hooked rugs tend to have an even length pile, there is no reason it has to have a single texture. Many other methods employ a mix of textures and you can do the same with latch hooked rugs. A rug with a very dense pile can be sculpted by trimming the pile to different lengths with sharp scissors (a bit like commercially made Chinese rugs). There’s a whole school of rug-making based on sculpting the rugs to create a 3D effect, but it’s best to start out simply. These photos show the effect of mixing different rug-making methods in a single rug.
If you’re mixing colours and textures in a floor rug, choose a simple colour scheme - or work the rug in a single colour, so that the texture is the main feature. If you are making a wall hanging or frieze, you can mix long and short pile, colours, cross-stitch/rice-stitche and even fabric strips to make an artwork. If you don't like trimming rugs into circles, work the rug design in pile and then use a flat stitch (rice stitch, cross stritch, half-cross stitch etc) and a neutral colour around the curved edges to file a square of canvas. This can be used to great effect to make a faux tiger/leopard/lamb pelt rug. Because of the difficulty in getting rya canvas, a work-round was to alternate rows of rya-length tufts with rows of cross-stitch. This also gave a slightly firmer texture to the base of a shaggy rugs, slightly lifting the longer strands at the base.
 |
JOINING CANVASES
I like to create large rugs, which means joining two lengths of canvases together along their selvedge (woven edges) to create a wider piece. Here's how I do this: Trim the woven edge from one canvas. Lay this on top of the other canvas giving an overlap of at least 6 holes. Whip (stitch) the cut edge of the top canvas to the lower canvas. The pile will hide the edge. Turn canvases over (lower canvas uppermost). Whip the lower canvas to the upper, just inside the selvedge of the lower canvas. Keeping the selvedge attached to the lower canvas prevents fraying. When working the joined section, knot through both layers of canvas. If you are cutting your yarn, it can help to have strands an extra 2mm long for this section to accommodate the slightly larger knot.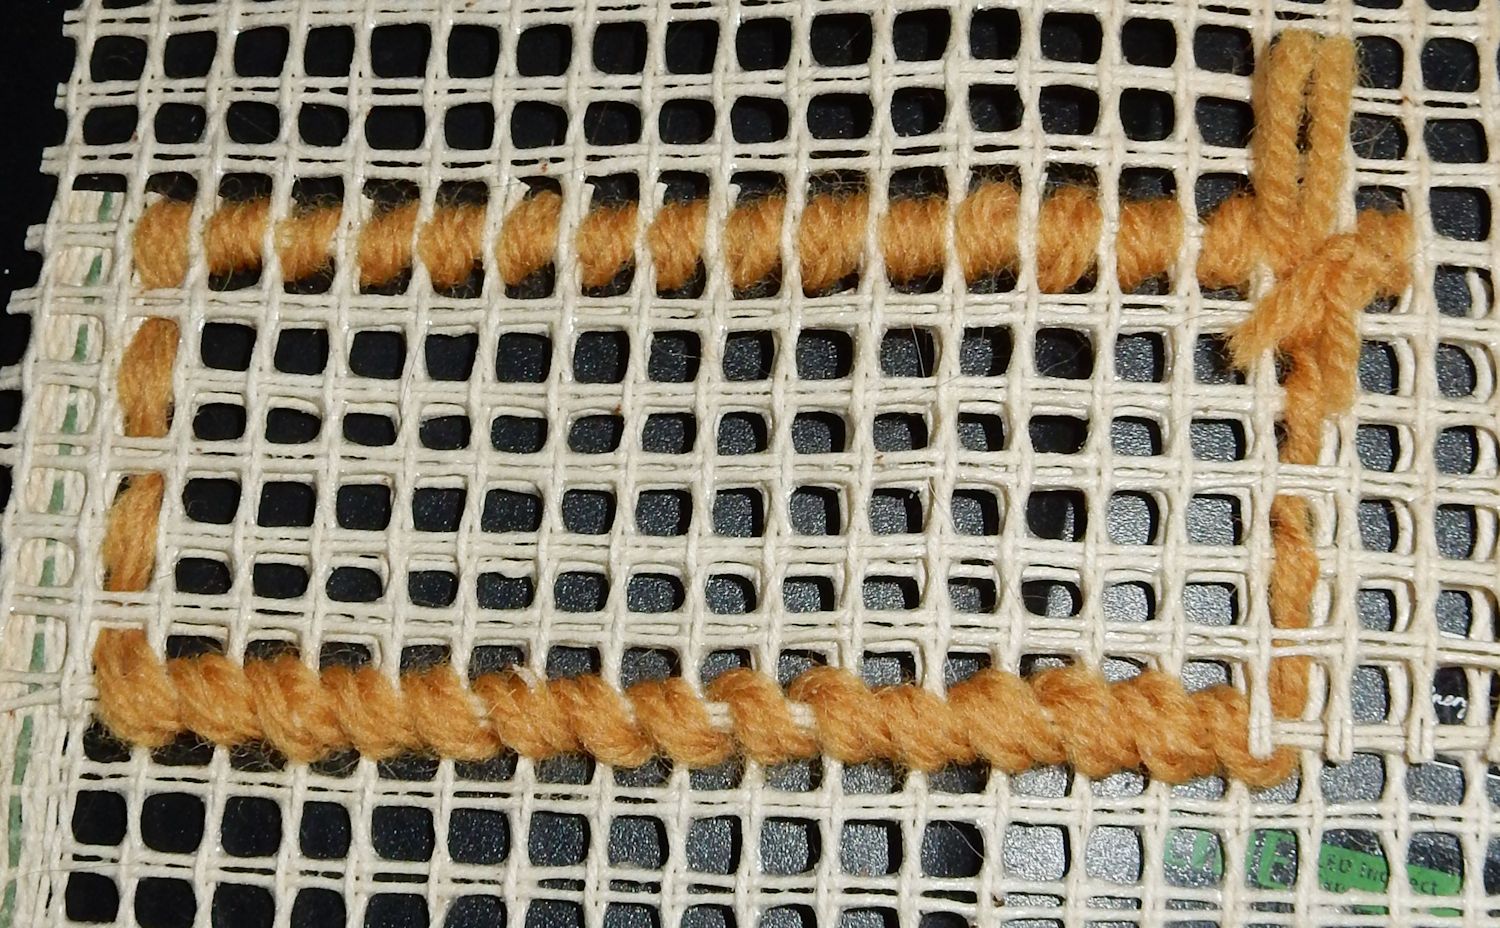
Joining two pieces of canvas. I've used knitting wool for the photo, but flax thread is less obtrusive.
PATCHING CANVASES
To patch a hole or tear in the canvas, your will need a piece of canvas larger than the damaged section.
For a hole in the middle of a canvas, position a piece of canvas on the underside so there is plenty of overlap (you may need to unpick part of the pattern - if so, make a squared chart so you can easily restore that section). On the underside, I stitch the edges of the patch to the hole; on the upper side I stitch the edge of the hole to the patch, to prevent fraying.
The method of patching an edge is much the same, except I prefer to place the patch on the topside for neatness. You will also need to secure frayed threads for the selvedge by binding them, or by weaving them into the new piece, to prevent further fraying. After repairs, binding the edge is recommended to protect against fraying.
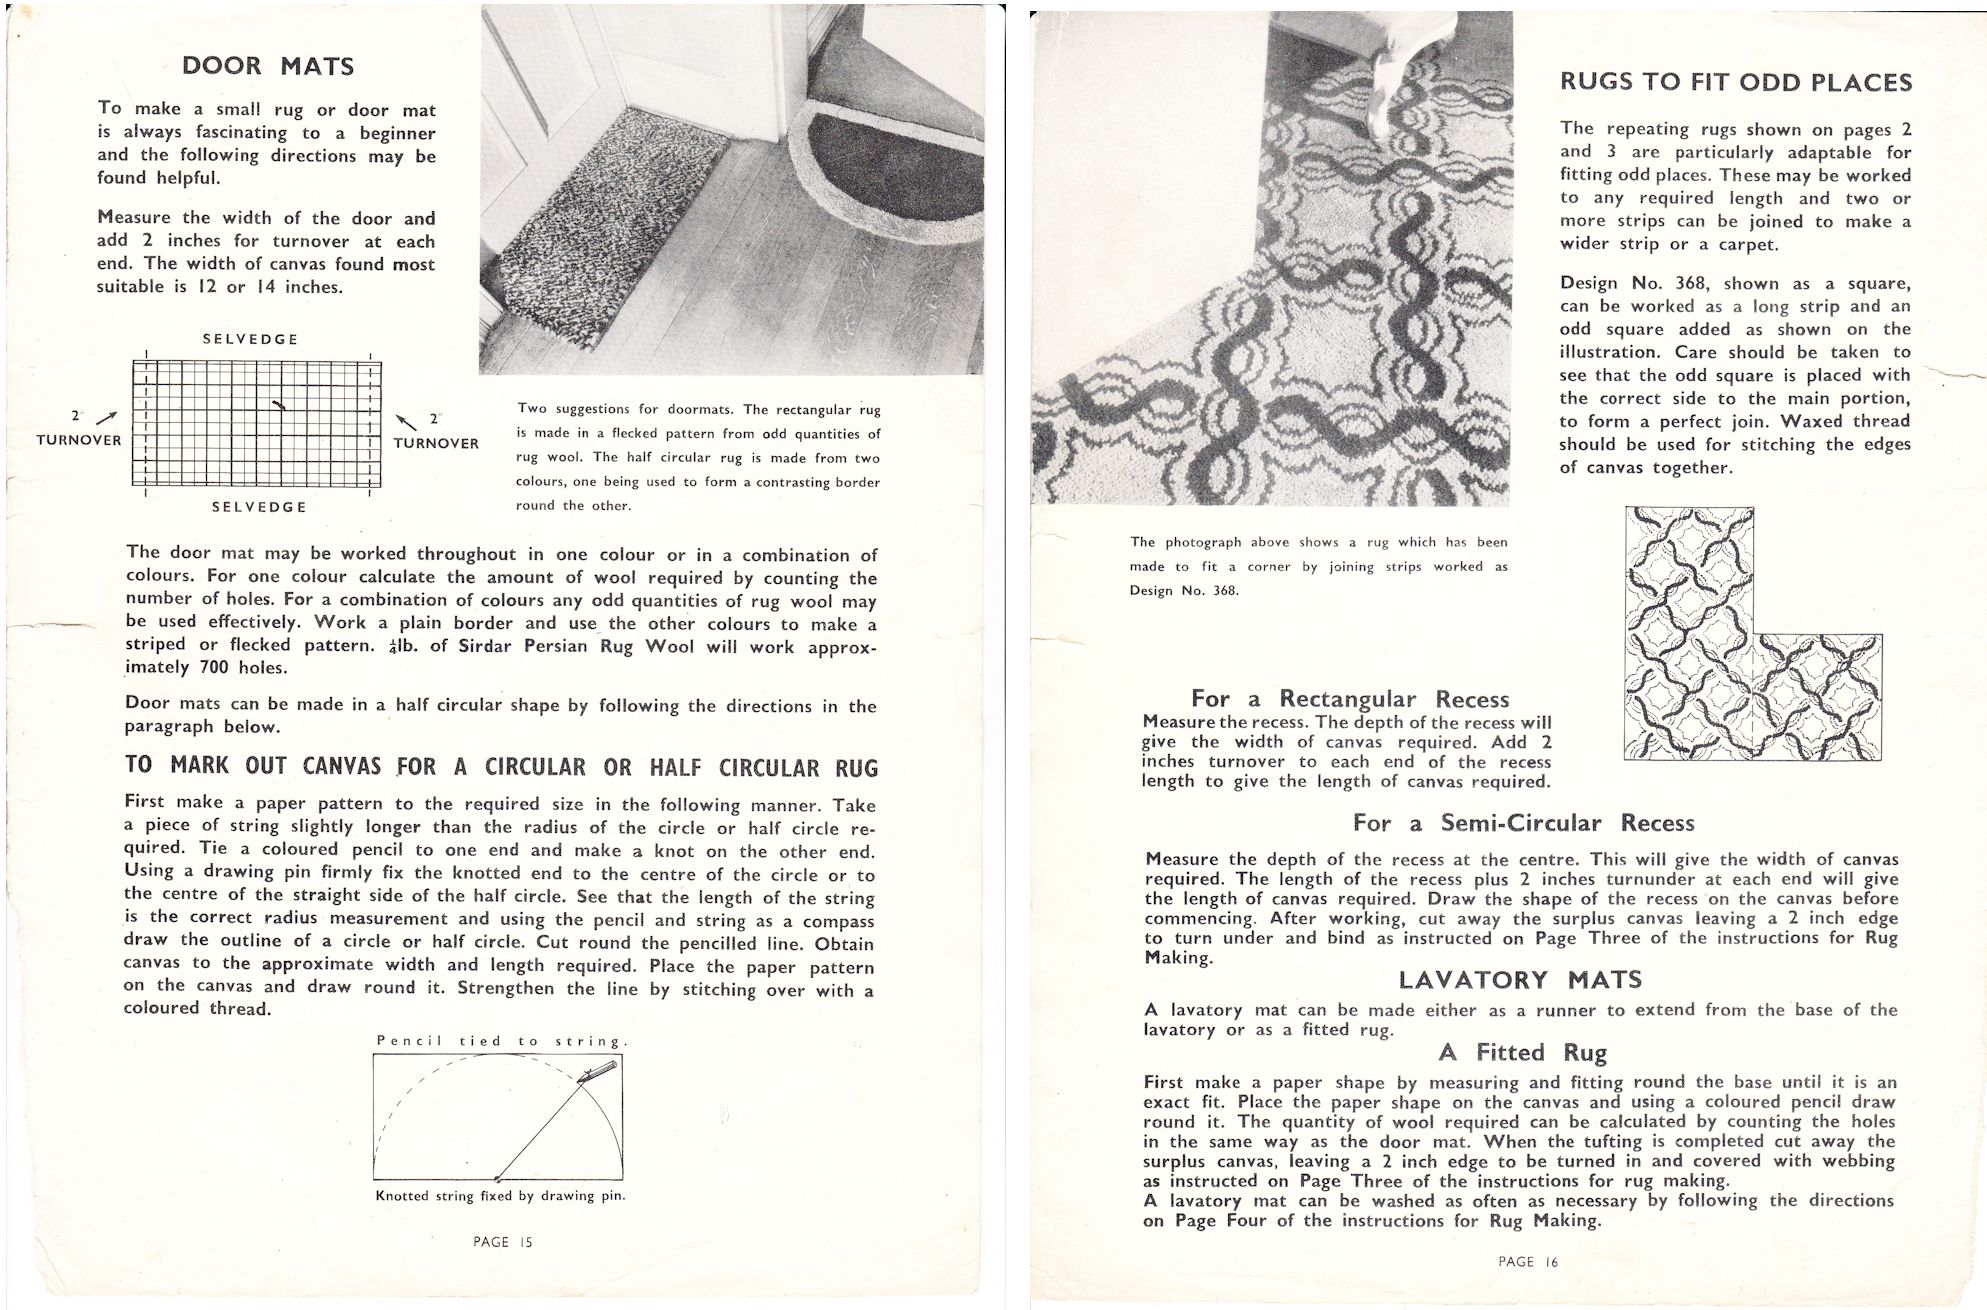
RUGS TO FIT ODD PLACES
This page came inside a Patons catalogue and was evidently taken from another (unknown) magazine.
RANDOM TIPS
If you are reworking an old rug and don't have enough of the original background colour, add flecks of another colour either evenly or randomly. You can use either a contrasting hue to give a flecked or spotted effect, or use the closest colour match as the flecks will be barely visible. For my kri-kri rug I used flecks of several browns to give a natural stone effect instead of a flat brown background. For my unicorns I had bags of oddments to use up so I placed similar shades next to each other to give a faded/discoloured effect at the edges and a spectrum effect elsewhere. In some cases, you can simply substitute a different colour throughout the rug.
CLEANING MY RUGS
Generally I've taken rugs out of doors and beaten the dust out of them, but they can be washed. Although the woollen yarns claim to be colourfast, I find that the deeper colours tend to bleed into the lighter colours. Acrylics don't seem to have this problem.
I have washed acrylic yarn rugs at low temperature in my washing machine (no spin). For wool and wool mixes, I found that hand washing rugs in the bathtub and air-drying them outdoors on a warm day worked well. I use a low-temperature liquid detergent or hand-washing detergent (e.g. Dreft) or even hair shampoo. The problem comes when I want to move a wet rug from bathroom to washing line; my solution was to drain the rug on an airing frame over the bath for an hour and let the excess water run off.
It's not feasible to wash my larger rugs, especially the 2m x 2m griffin, as these become too heavy to move when waterlogged. A wet/dry vacuum cleaner (such as a VAX) spruced them up a bit. Admittedly this is a problem of my own making as like making really big rugs that can take years to complete!

You are visitor number: