 |
THRIFTY RUG MAKING (1959)
"Thrifty Rug Making" by Bessie Hawker-Smith was published by Pitman in the 1950s and went through at least 5 reprints. It covered various methods of rug-making. The section on hooked or knotted rugs describes the use of Brown's rug tool, more often used for making rag rugs. It also has the recipe for making flour-and-water paste for stiffening the canvas or stiffening a limp rug.
|
|
THRIFTY RUG MAKING, INCLUDING SURREY STITCH RUGS
By B. Hawker-Smith
With a Foreword by LADY DOWSON
FOREWORD
Those of us who have had the privilege of being taught by Mrs. Hawker-Smith will know how useful this little book is likely to prove to those who have not had the same opportunity.
It is a little too much to ask that she should convey in a book quite the same personal influence that she has over her pupils in her classes; for the keenness which she inspires in them is, I think, in part due to the fact that she leads them to discover and develop a talent that they did not know that they possessed.
Yet this little book with its clear and simple instructions must come very near to giving to those who take the trouble to follow them, just the same sort of enthusiasm that she inspires in her pupils.
EVA DOWSON
Walton on the Hill
PREFACE
This little book is the outcome of many requests from all parts of the country for instruction in working the new Needle Pile Rug with the Surrey Stitch. It also includes various other rugs which cost little to make and have given pleasure to many; and it is hoped that it will be a means of helping others to a useful, profitable, and inexpensive way of spending leisure hours.
Bessie Hawker-Smith
WOOL PILE RUGS
Inexpensive Wool
Twofold carpet wool (thrums) is still the cheapest and best to buy, in spite of the rise in prices. These thrums are the ends of varying lengths left when the carpets are finished on the looms. When a carpet is woven, there is wool left over, and this wool, which has been cut from a finished carpet, will provide a blend of colour that will make a very attractive rug.
Rug making is satisfying and soothing, and working with thrums makes it very economical. The price of wool varies with conditions and, with the rise in prices, wool that was sold for one shilling a lb. is now four shillings and eleven pence a lb., and it Varies in length from i yard to small skeins. Cheaper thrums can be obtained, but are shorter and suitable only for the knotted method or knitted method. The longer wool is most suitable for the "Surrey Stitch" method.
In deciding on quantities of wool, allow 6-8 oz. to 1 sq. ft. of canvas. Jute Embroidery Canvas is a suitable material, and a fine rug canvas can now be obtained again (24 stitches to a square inch). Two threads of wool should be used for "Surrey Stitch." The cost of the canvas, too, has advanced, but these rugs are still the cheapest and best hand-made rugs on canvas.
Tools
A packet of rug needles No. 14 for finishing ends and sides, and also for doing the Needle Pile or Surrey Stitch. A rug hook for pile rugs - Brown’s Rug Hook is best, as this knots and tightens in one movement. A small wooden gauge for use when the lengths of wool are being cut, if the knotted method is chosen.
Colours
Before deciding on your design it is better to sort your wool into colours, not shades, putting all colours into separate heaps, viz. blues, reds, browns, fawns. These can each be subdivided into light and dark. Having sorted the wool, you can try out ideas for your colour scheme by laying out the wool on the floor and placing the colours in various positions.
If borders are being used, you can vary the ground colour of the borders according to taste. A rug 36 in. wide will take three borders of various widths: for example, 5 stitches, or rows, of a fairly dark colour, 1 row of outline, 15 rows for main border another colour, another row of outline, 10-12 rows of the darker inner border.
The ground of your centre can match in tone the wide main border. You will be guided by individual taste and wool available. A very soft effect can be given by mixing the shades of wool, taking two near shades and working them together. Two strands of thrums are always used in each hole of the canvas; so that mixing is quite easy and can be very beautiful.
Lovely effects can be gained by shading the colours in the motifs of the design. The hard, or static, colours are useful for lining, but should not be used for large surfaces. They can often be softened and toned down by mixing a dull shade of the same colour with them. I have used as many as nine shades of one colour and achieved a completely new shade. Remember that it is only the ends of the wool that show in pile rugs.
It is a good plan to put aside all black, n*gger [dark brown], black-berry, navy, or other dark shades for the time being to use as outlines. The value of outlining can be seen when you are dividing colours, and serves to draw two opposing colours together to harmonize.
When a bundle of mixed thrums is being used the design is often governed by the colours. Before proceeding farther, divide each colour into four groups, so that you can get an even balance over the whole rug.
Never start off with one colour till you are sure you have enough to finish. Begin mixing at once if you have to mix. A rug is often spoilt because the colour has had to be changed suddenly.
Designs
Having sorted your wool and decided on your colour scheme, you must now decide on your design. A sheet of squared paper will help you here. Even if you cannot design, you can divide your rug up into borders and get your proportions, counting one square on the paper as one stitch on the canvas. When you have decided on the width of your border, it is easy to calculate the quantities of wools required. Count the total number of stitches in one-quarter of the border, and also count the number of stitches taken up by the pattern in that part of the border. Then subtract the number of the pattern stitches from the total number of stitches, and the remainder will give you the number of stitches required for the ground. Six hundred knots can be done with 2 oz. of wool. So that you can easily work out how much wool you will want for groundwork and pattern respectively.
A rug that is designed or adapted by the worker will give twice as much pleasure as one worked to a bought pattern. If a chance offers, pay a visit to the Textile Department of the Victoria and Albert Museum, and look at the rugs there: it will help you to visualize the possibilities of your own rugs. Geometrical patterns are most suitable. It is surprising what a number of interesting designs can be made by using only three lines - vertical, diagonal, and horizontal - as a basis. Not all people can design, but I have been surprised at the number who have discovered that they can do so and who have gained great pleasure thereby. Other people, including menfolk, are often very interested to discuss or to help with designing. A beautiful design with lovely colouring is worthy of the best technique - so watch your beginnings and your endings.
EDGING AND FINISHING
Before describing the various rugs, it will be as well to talk a little about the finishing of edges and ends of rugs. These remarks apply to all the rugs described in this book.
Take your length of canvas and at each end turn down on the right side not less than 2 in. - a little more for a large rug. Care should be taken that the threads of the turned-over canvas lie exactly over the threads below: stitches have to be worked through this double canvas. Herring-bone this canvas carefully and firmly with thread.
Now look at Fig. 1, Plait Stitch, and work the Edge Plait as follows. Take two threads of wool in needle; insert needle between the two layers of canvas and overcast the extreme left-hand edge of the corner. Then proceed to cover the top edge of canvas with the plait stitch as follows: work one cross stitch to begin; continue with overcasting type of stitch, but go one hole forward then two holes back, pulling the wool firmly. Work to the end and overcast the edge of second corner.
Look again at diagram for the second row (Flat Plait); this is very like the first. Now working over the two weft threads immediately below the edge plait, slip the needle in between the threads as before and do a single cross stitch to start, bringing needle out at left-hand hole at bottom of row. * Insert needle one hole forward at top of row, making a long stitch; take a downward stitch to bottom. Insert needle again two holes back at top and bring it out in a slanting movement one hole forward. Repeat from * to end of row.
Having finished the hem, proceed to cover the selvedge, as follows. Turn over one thread of the selvedge and take one thread of thrums in the needle - as the weft threads are farther apart than the warp ones, they can be counted singly. Run wool in edge and proceed to do the plait stitch, taking one thread forward and three threads back. Work tightly to avoid a frilly edge, as the knotting pulls the canvas up.
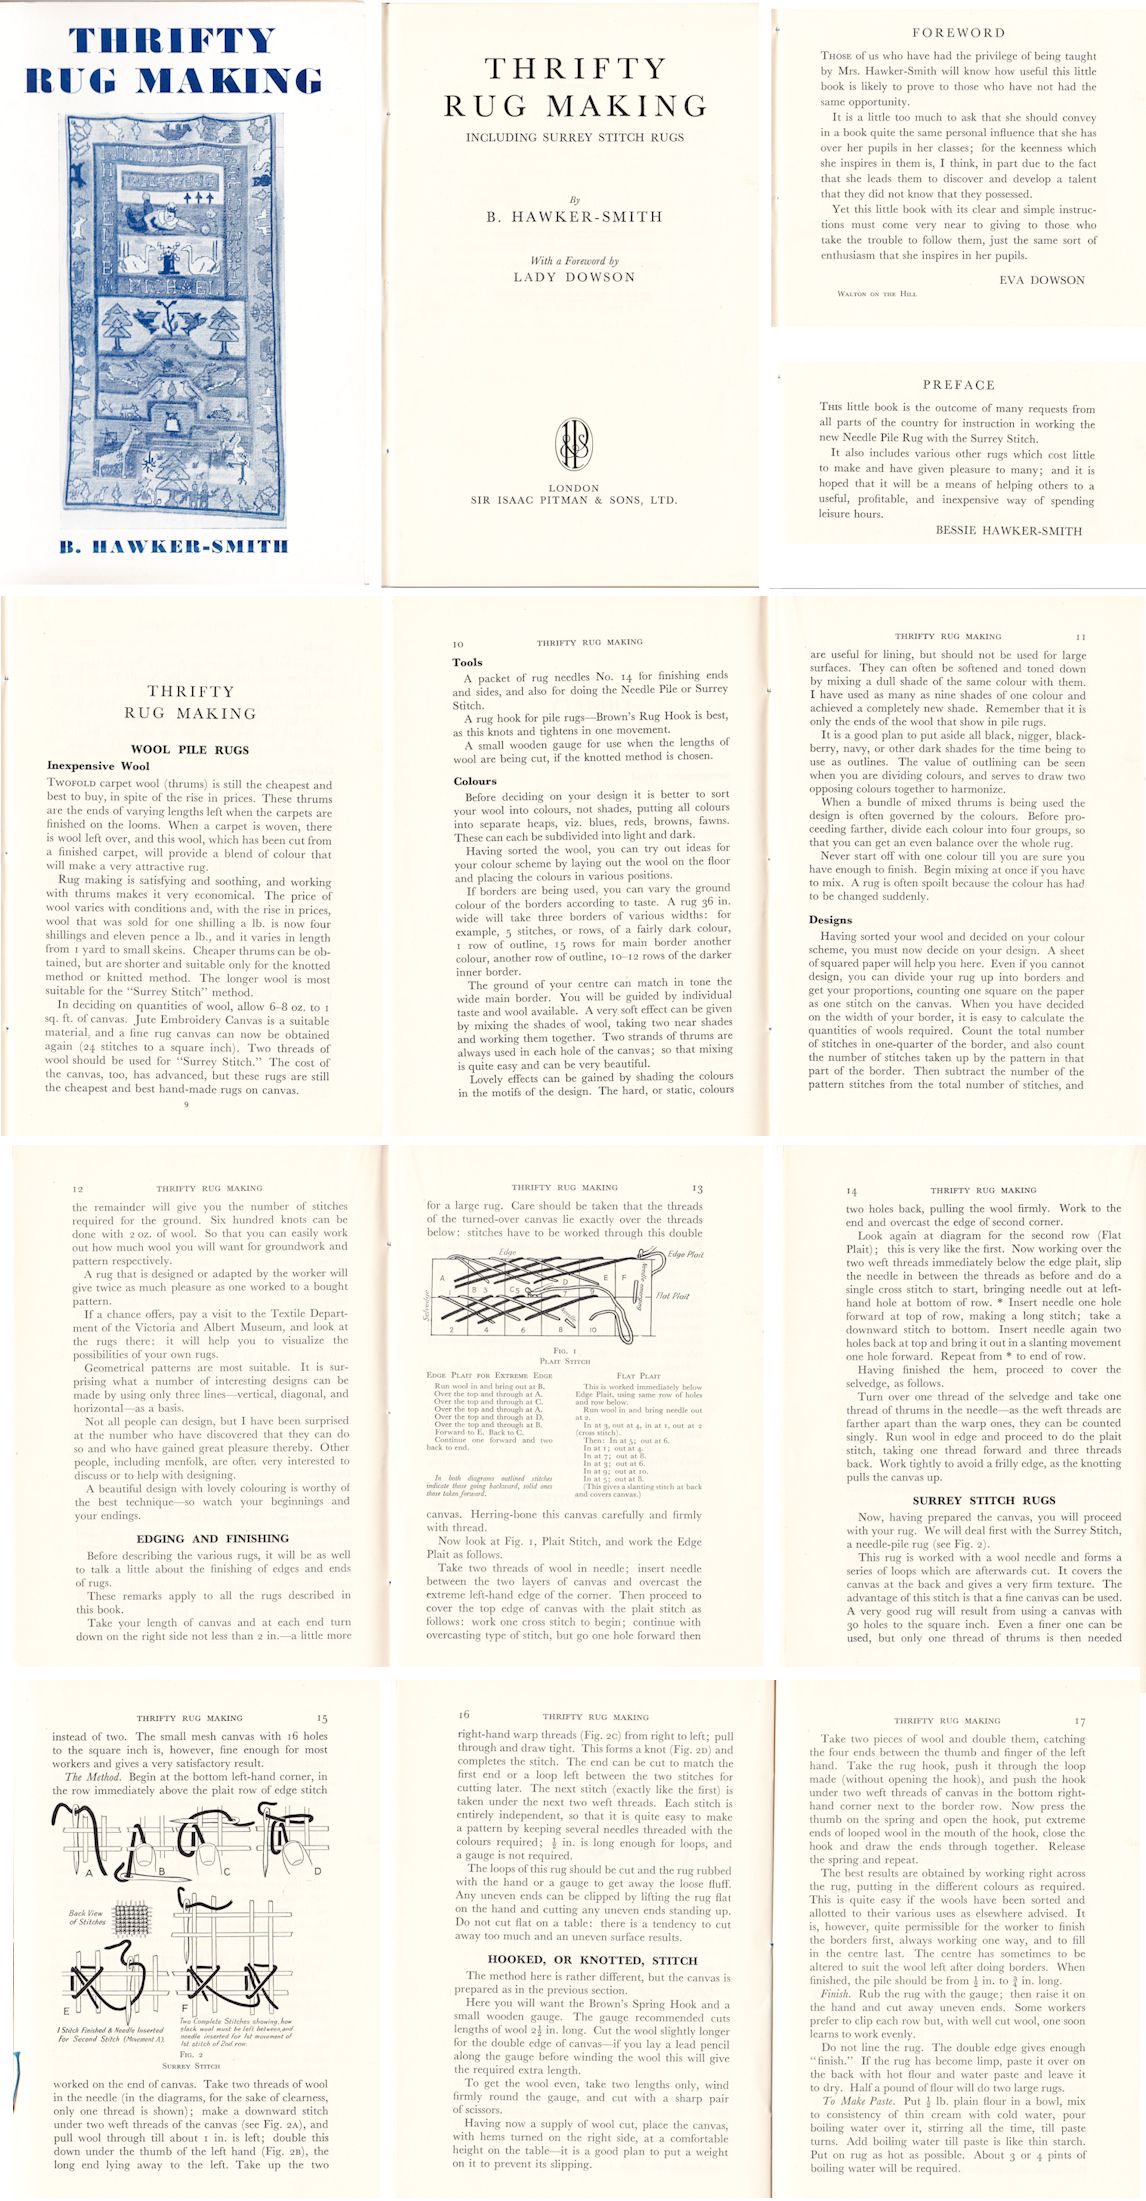
SURREY STITCH RUGS
Now, having prepared the canvas, you will proceed with your rug. We will deal first with the Surrey Stitch, a needle-pile rug (see Fig. 2). This rug is worked with a wool needle and forms a series of loops which are afterwards cut. It covers the canvas at the back and gives a very firm texture. The advantage of this stitch is that a fine canvas can be used. A very good rug will result from using a canvas with 30 holes to the square inch. Even a finer one can be used, but only one thread of thrums is then needed instead of two. The small mesh canvas with 16 holes to the square inch is, however, fine enough for most workers and gives a very satisfactory result.
The method. Begin at the bottom left-hand corner, in the row immediately above the plait tow of edge stitch worked on the end of canvas. Take two threads of wool in the needle (in the diagrams, for the sake of clearness, only one thread is shown); make a downward stitch under two weft threads of the canvas (see Fig. 2A), and pull wool through till about 1 in. is left; double this down under the thumb of the left hand (Fig. 2B), the long end lying away to the left. Take up the two right-hand warp threads (Fig. 2C) from right to left; pull through and draw tight. This forms a knot (Fig. 2D) and completes the stitch. The end can be cut to match the first end or a loop left between the two stitches for cutting later. The next stitch (exactly like the first) is taken under the next two weft threads. Each stitch is entirely independent, so that it is quite easy to make a pattern by keeping several needles threaded with the colours required; half inch is long enough for loops, and a gauge is not required.
The loops of this rug should be cut and the rug rubbed with the hand or a gauge to get away the loose fluff. Any uneven ends can be clipped by lifting the rug flat on the hand and cutting any uneven ends standing up. Do not cut flat on a table: there is a tendency to cut away too much and an uneven surface results.
HOOKED, OR KNOTTED, STITCH
The method here is rather different, but the canvas is prepared as in the previous section. Here you will want the Brown’s Spring Hook and a small wooden gauge. The gauge recommended cuts lengths of wool 2-and-a-half in. long. Cut the wool slightly longer for the double edge of canvas - if you lay a lead pencil along the gauge before winding the wool this will give the required extra length. To get the wool even, take two lengths only, wind firmly round the gauge, and cut with a sharp pair of scissors.
Having now a supply of wool cut, place the canvas, with hems turned on the right side, at a comfortable height on the table - it is a good plan to put a weight on it to prevent its slipping.
Take two pieces of wool and double them, catching the four ends between the thumb and finger of the left hand. Take the rug hook, push it through the loop made (without opening the hook), and push the hook under two weft threads of canvas in the bottom right- hand comer next to the border row. Now press the thumb on the spring and open the hook, put extreme ends of looped wool in the mouth of the hook, close the hook and draw the ends through together. Release the spring and repeat.
The best results are obtained by working right across the rug, putting in the different colours as required. This is quite easy if the wools have been sorted and allotted to their various uses as elsewhere advised. It is, however, quite permissible for the worker to finish the borders first, always working one way, and to fill in the centre last. The centre has sometimes to be altered to suit the wool left after doing borders. When finished, the pile should be from half inch to three-quarter inch long.
Finish. Rub the rug with the gauge; then raise it on the hand and cut away uneven ends, Some workers prefer to clip each row but, with well cut wool, one soon learns to work evenly.
Do not line the rug. The double edge gives enough "finish." If the rug has become limp, paste it over on the back with hot flour and water paste and [leave it to dry. Half a pound of flour will do two large rugs.
To Make Paste, Put half lb. plain flour in a bowl, mix to consistency of thin cream with cold water, pour boiling water over it, stirring all the time, till paste turns. Add boiling water till paste is like thin starch. Put on rug as hot as possible. About 3 or 4 pints of boiling water will be required.
FLAT, OR NEEDLE, RUGS
For those people who prefer needlework rugs there are many varieties, and these rugs are attractive and practical, particularly for use on a carpet. There is nothing new in the actual stitches, as most of the more solid embroidery stitches can be used for this type of rug.
The rug can be made with coarse Patterdale canvas and Herdwick wool, a good hard-wearing wool made from the fleece of the Cumberland sheep. A finer rug can be made on the smaller mesh used for thrums J or on the still finer canvas, 25 to 30 holes to the square inch, with which a very fine and interesting rug can be made.
Any stitch chosen must be of the more solid type and not one of the lighter embroidery stitches. An important thing to remember is to use stitches that will fill the canvas back and front. The following are among the most suitable: Portuguese Peasant, Long Leg Cross Stitch, Ordinary Cross Stitch, Half Cross, Interlock Gobelin, Crossed Corner, or Rice, Stitch, Barred Cross, or Reversible.
Prepare the canvas as before, but turn under on the wrong side, instead of on the top as in pile rugs. The edges can be worked in the same way as in pile rugs.
Very beautiful effects can be gained by varying the stitches, using some for ground and others for outlining, and again others for filling.
The Portuguese Peasant rug is worked on a fine canvas of the hessian type and the same stitch is used throughout. The effect is worked out by following the pattern round instead of working in straight lines. The Portuguese often use the carnation for a design and also put a motif in the middle containing a figure of an animal or a little man and woman - these latter for the marriage rugs. These rugs are very fine and interesting and the wool is fine. (See Fig. 3 A - F for the stitch.)
If the Patterdale canvas (which is very coarse string canvas) is used, the interlock is a good stitch for the general ground, crossed corners, or rice, stitch (Fig. 4 A -G) is good to outline the pattern, and ordinary cross stitch for the filling of patterns.
If a stiff or squarish design is being used, a good stitch is the barred cross stitch, as this is both sides alike (Fig. 5). Canvas 16 holes to the square inch worked with double thrums makes a very good rug indeed. In using thrums there is sometimes an unevenness in texture; this can be overcome by laying or tramming a piece of wool under the stitches. Care should be taken to cover loose ends. The best way is to run the wool between the threads of canvas and work over it, so that no untidy ends are left behind.
The stitches I have mentioned are safe ones to use. The worker may find many others. Care must be exercised, as some stitches tend to pull the canvas crooked.
THRIFT RUGS
The Thrift rug opens up a very wide field, as there is scarcely anything in the way of old materials which cannot be used up, from silk stockings and underwear to old suits and even sacks. A great favourite is the Hookey rug, which has a very interesting history.
Hookey Rugs
Preparation of Materials. If stockings are to be used, carefully undo the hem, cut the extreme toe off, and cut out the heel. Stretch the stocking on the hand and cut one thickness only, round and round about 1 in. wide, making one long strip. Roll a number of these strips tightly into balls and fasten. The longer these balls are kept the better, as the material is then nicely stretched.
Any old cloth or cotton rags can be used, torn or cut into strips, the width varying with the thickness and texture of the material. A more satisfactory rug is obtained if material of like texture is used, e.g. all woollens or all cottons.
This rug is best made on a foundation consisting of a sugar bag, well washed and stretched on a wooden frame made of four flat pieces of wood, which can be fixed together with pegs. The two end pieces should be long enough to take the width or length of the rug, and both should have a piece of webbing nailed firmly along their length to which the two sides or ends of sacking or hessian are sewn firmly. Before sewing on to frame, spread out the sacking and carefully mark the middle point of both length and breadth. If borders are to be used, carefully mark them in, using a thread on the sacking as a guide for a straight line - a thread can be drawn for this purpose. It is most important that where lines and borders are used they should be straight. A very cheap paint brush and bottle of ink are most useful for marking in lines and patterns. To get your proportions you can cut paper patterns and lay them on to the sacking; this gives a fair idea of the finished article. Here, as in the thrums rug, your pattern will be somewhat governed by the material and colours you have by you. If you are using old stockings, sort them and divide into four equal sets of colour. The natural shades of the stockings make fascinating rugs, especially if you use a simple design such as fish scale, feather, squares, diamonds, or any old quilting design. But if a coloured rug is liked, this can be obtained by dyeing.
Having sorted and prepared your stockings and drawn your design, leave an inch or two all round the foundation sacking for finishing, and sew two sides to the frame webbing. One end of the sacking can now be rolled and the stretcher, or side pieces, fixed. When stretched the sides can be pinned to stretcher or fixed with tapes, and the sacking is ready for working.
There are various tools sold for this rug. The one recommended is the slip-knot hook, which is a large crochet hook, with a knot in the handle to support the thumb; but almost any hook can be used.
Any cloth can be used in the same way as the stockings, but thick cloth needs cutting much finer than a very thin cloth. As has been said, a rug is better if the material used is of the same type, viz. all stockings or like material, all woollen cloth, or all cotton.
Now you can get to work. Rest the frame between two chairs or tables so that you can have your left hand underneath, and the right, with the hook, on top. Hold end of material in left hand, push hook through, and with it lift end of material through on to top. Push hook in again two or three threads forward and lift a loop of material through. Continue lifting loops through at even intervals, always working away from the first stitch. When you cannot go any farther or have finished a pattern or ball of material, pull end through on to right side as you did at the start, and cut level.
This rug should be worked very close so that no canvas is seen, on wrong side, which should be very smooth. If loops are uneven on top they can be cut off level as in beginning and finishing. Some people cut all loops, but rugs with loops uncut are to be preferred.
In this rug it is a good plan to do the outlining of the pattern first and fill in afterwards. As you finish one portion, unwind the unworked end of the rug and wind up the finished end; then tighten up stretchers and continue work. When all is worked, take the rug out of the frame, hem or bind sides and ends, and your rug is finished.
There is no need to line this rug. It wears excellently and does not hold the dust. If new Burlap Canvas (a hessian made specially for these rugs) is used, it is more satisfactory to wash this before using.
Plaited Mats
Another excellent way of using up woollen or cotton rags is the plaited and coiled rug. For this, wash (and dye if desired) any old woollen or cotton rags, and cut or tear into even lengths, about half in. to 1 in. wide, according to texture. Take five uneven lengths so that all joins will not be in the same place, sew the five ends together, and fasten to a chair back or door-handle. Now make a Greek plait, viz.: (1) take outside right strip over two strips to the left; (2) take left outside strip over two to the right; repeat 1 and 2. Work firmly.
As each end is used up, carefully sew on a fresh piece and your joins will not show. When a good length of plait has been made, this can be coiled into an oval, round, or oblong mat, and each row securely sewn with a strong stitching twine. A curved upholsterer’s needle or a small packing needle is very useful for this purpose.
Short pieces of cloth, etc., of equal length can be plaited and formed into circles or coils and sewn round the plain rows, adding several rows of plain outside the circles to finish off. A row of coils (5-7 according to length required) can also be used in the middle of a mat and makes it very attractive.
The interested worker will see many ways of introducing colour schemes into these mats.
The instructions above will apply to any class of material, whether of wool, cotton, old stockings, or sacks. Mats of this description were used on the floor of George Washington’s house.
String Mats
Binder twine, a waste from farms and market gardens, and the grass plait which is used on orange boxes, both make a good mat of the plaited type. I will describe here the way this mat was made by an old sea captain of my acquaintance; and I myself found it very good and easy to keep in shape.
Get any old picture frame or similar frame and tie the plait round the inside, beginning half-way along one long side and tying in each corner. Sew several rows round, then a row of coils, more rows, and finish with either coils or lines in the centre. If a small picture frame is used, the mat can be enlarged from the outside, once the shape is obtained.
Mats from Sacks
Sacks are used in many parts of the country to lay on scullery floors, but they are much more interesting if they are first transformed into proper mats. The following is very easily and quickly done. Take two or more sacks and cut from one a piece large enough for the rug intended. The remainder can be dyed or used as it is. Gut this up into 3-in. wide strips, being careful to cut by a thread. Fray each piece on both sides, leaving about 1 in. in the middle. (Save all frayings and roll into balls for future use.)
When a good number of strips have been cut and fringed, take a hot iron and press each strip not quite in half, so that one fringe overlays the other slightly. Hem the foundation canvas. Beginning about half-way along the outside edge of the foundation piece, firmly sew on a piece of fringe, mitring corners carefully and joining each fresh piece invisibly. When outside is finished, start second row about half in. inside first row and a little way along, so that all joins do not come in the same place.
It is a good plan to rule lines from corners to the centre as a guide for the mitred corners. If the sacking is dyed in various colours unevenly, the vari-coloured fringe resulting gives a very pretty effect.
Continue the rows till the sacking foundation is completely covered. When the middle is reached, lay a piece of fringe down the middle. Stitch flat and pull all long threads out so that nothing but fringe shows.
The threads resulting from the fringeing for this rug, which you will have rolled into balls, will serve to make a very pretty rug, using the method described for Hookey rugs. Make a foundation of sacking and stretch on frame. Now take 8 threads at a time and hook into the canvas in little loops.
We have recently made some really good mats from old sacks, which have been washed, using together natural coloured sacks and hop manure sacks (these latter are coloured orange or green). The instructions in the section on Plaited Rugs will apply for these also.
Method. Unpick the sack and cut the longest way into strips, counting five threads in each strip (and being careful to cut by a thread). Do not pull out the little cross pieces, but pin five pieces together. Plait with Greek plait, twisting each piece on your work: this forms a sort of chenille. There is nothing so good as sacking for cleaning the mud of the countryside from the shoes, and these mats have proved really useful and attractive, while costing nothing but a little labour.
If a larger plait is desired, seven or nine pieces may be used; the outside piece, in these cases, passing over three or four strands respectively.

You are visitor number: