RUGS - YARNS AND CANVASES
CANVAS TYPES
Holes Per Inch
The more holes per inch, the smaller the pattern will turn out. Alternatively, if you are designing your own rug, more holes per inch can be used to add more detail (like higher resolution on a digital image).
3.3 hpi - standard canvas, suitable for for Anchor/Iriss wool or wool mix yarn. 3.3 holes per inch (hpi) is the most common and is the size found in old Readicut kits. 3.3 hpi canvases can also be used with cut strips of fabric to make latch-hooked rag rugs, instead of using hessian and a proddy/badger tool. 3.75 hpi has smaller holes, therefore the knots are closer together. This is better than 3.3 hpi when working with yarns that have a higher percentage of acrylic/nylon. Using standard acrylic rug yarnwith 3.3 and 3.75 hpi means a less dense pile and an inferior end result unless you work two strands of yarn as a single knot. 3.3 hpi canvas is nowadays most commonly found as 40 inch (100 cm) wide, so for wider rugs you will need to join one or more lengths of canvas together
4 hpi, 4.5 hpi is better suited for acrylic yarn if you want a dense pile. 5 hpi is used with thin rug yarns and long strands to create shag pile rugs and cushions. Some kits come with 4 hpi or 4.5 hpi to give denser rugs and more detailed designs with acrylic yarns. 4.5 and 5 hpi are better suited to longer, thinner strands and bold or abstract patterns (or to large needlepoint e.g. kneelers).
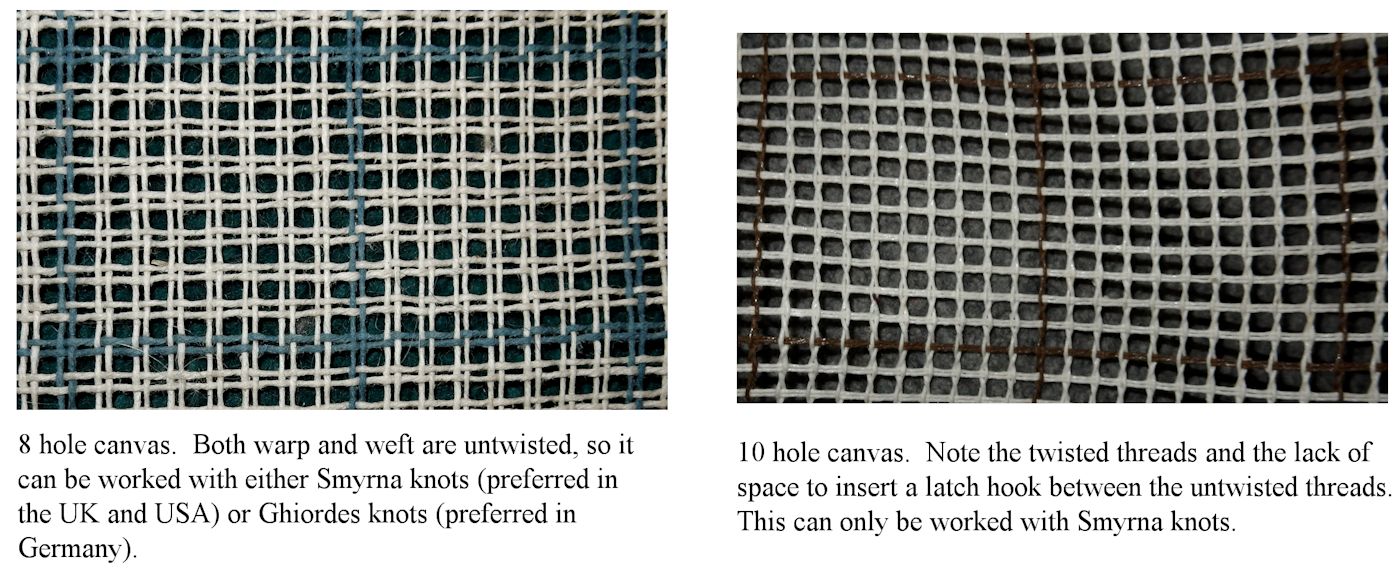
When I first took up latch-hooking, canvases were still sold as “8 hole canvas” or “10 hole canvas” rather than “holes per inch”. My inherited canvases were a mix of types. The number referred to the size of the guide squares (marked in coloured warp and weft). The guide squares of 8 hole canvas were 8 holes x 8 holes. The guide squares of 10 hole canvas were 10 holes x 10 holes. Nowadays, where guide squares are marked, canvases and patterns are standardised at 10 x10 holes. When working a pattern marked in 8 holes on a 10 hole canvas, or vice versa, it's necessary to ignore the guide threads and count knots instead.
What I knew as 8 hole canvas, or Turkey canvas, is more properly called Smyrna canvas and has distinctive tramlines. 10 hole Smyrna canvas was also made. Thirteen squares equals 4 inches. Unpainted Smyrna canvas used to be available in widths of 32, 40, 52, 60 and 80 inches, sold by the yard. Sudan canvas resembles Smyrna canvas and is used for finer rug work; it has 18 squares to four inches, and was sold in widths of 26 and 40 inches. What I knew as 10 hole canvas is called Dreher canvas and has a reinforced binding and twisted threads instead of tramlines in both directions. Compared to Smyrna canvas, it is less easily pulled out of shape, and hardly frays at the cut edges, but it is only suitable for simple Smyrna technique.
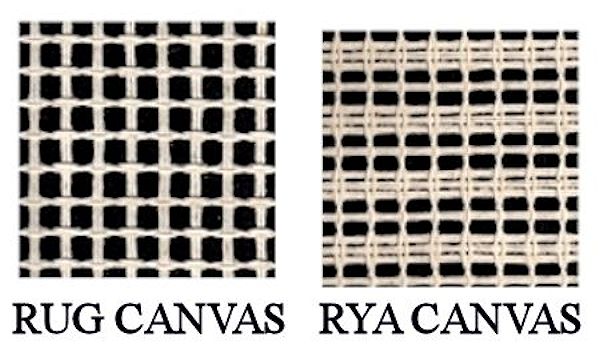
Rug Canvas and Modern Rya Canvas Compared
There are several other types of canvas. Double cotton weave has surface loops against a woven backing. The knots are worked using medium thick yarn on the surface loops only. It is worked using Smyrna knots (Latchet method 1 or 2) and 13 knots = 4 inches. Although I have never seen this style of canvas, it used to be sold in widths of 30, 38 and 46 inches with ready-woven patterns. It looks the same as the Patons Decorator Hooking canvas featured in their Australian rug and craft books.
Jute canvas is an elastic, hard-wearing weave and available in fine and coarse varieties. Coarse jute canvas was made in 34, 46, 50 and 80-inch widths; 11 knots = 4 inches. Fine jute canvas was made in 38, 48 and 62 inch widths; 16 knots = 4 inches. A red marker at every tenth stitch aided counting. Jute Finnen canvas was knotted with two strands of Smyrna yarn using the Finnen technique. The knotting rows were 1.75 inches apart, 10 knots to 4 inches. True Rya canvas was more closely woven than Finnen canvas and the knotting rows were 1.125 inches apart; 12 knots = 4 inches. It was worked in fine 3 or 4 ply Rya yarn using the Rya technique. Modern Rya canvas is show in the comparison above. Traditional Finnene and Rya canvases are shown below.
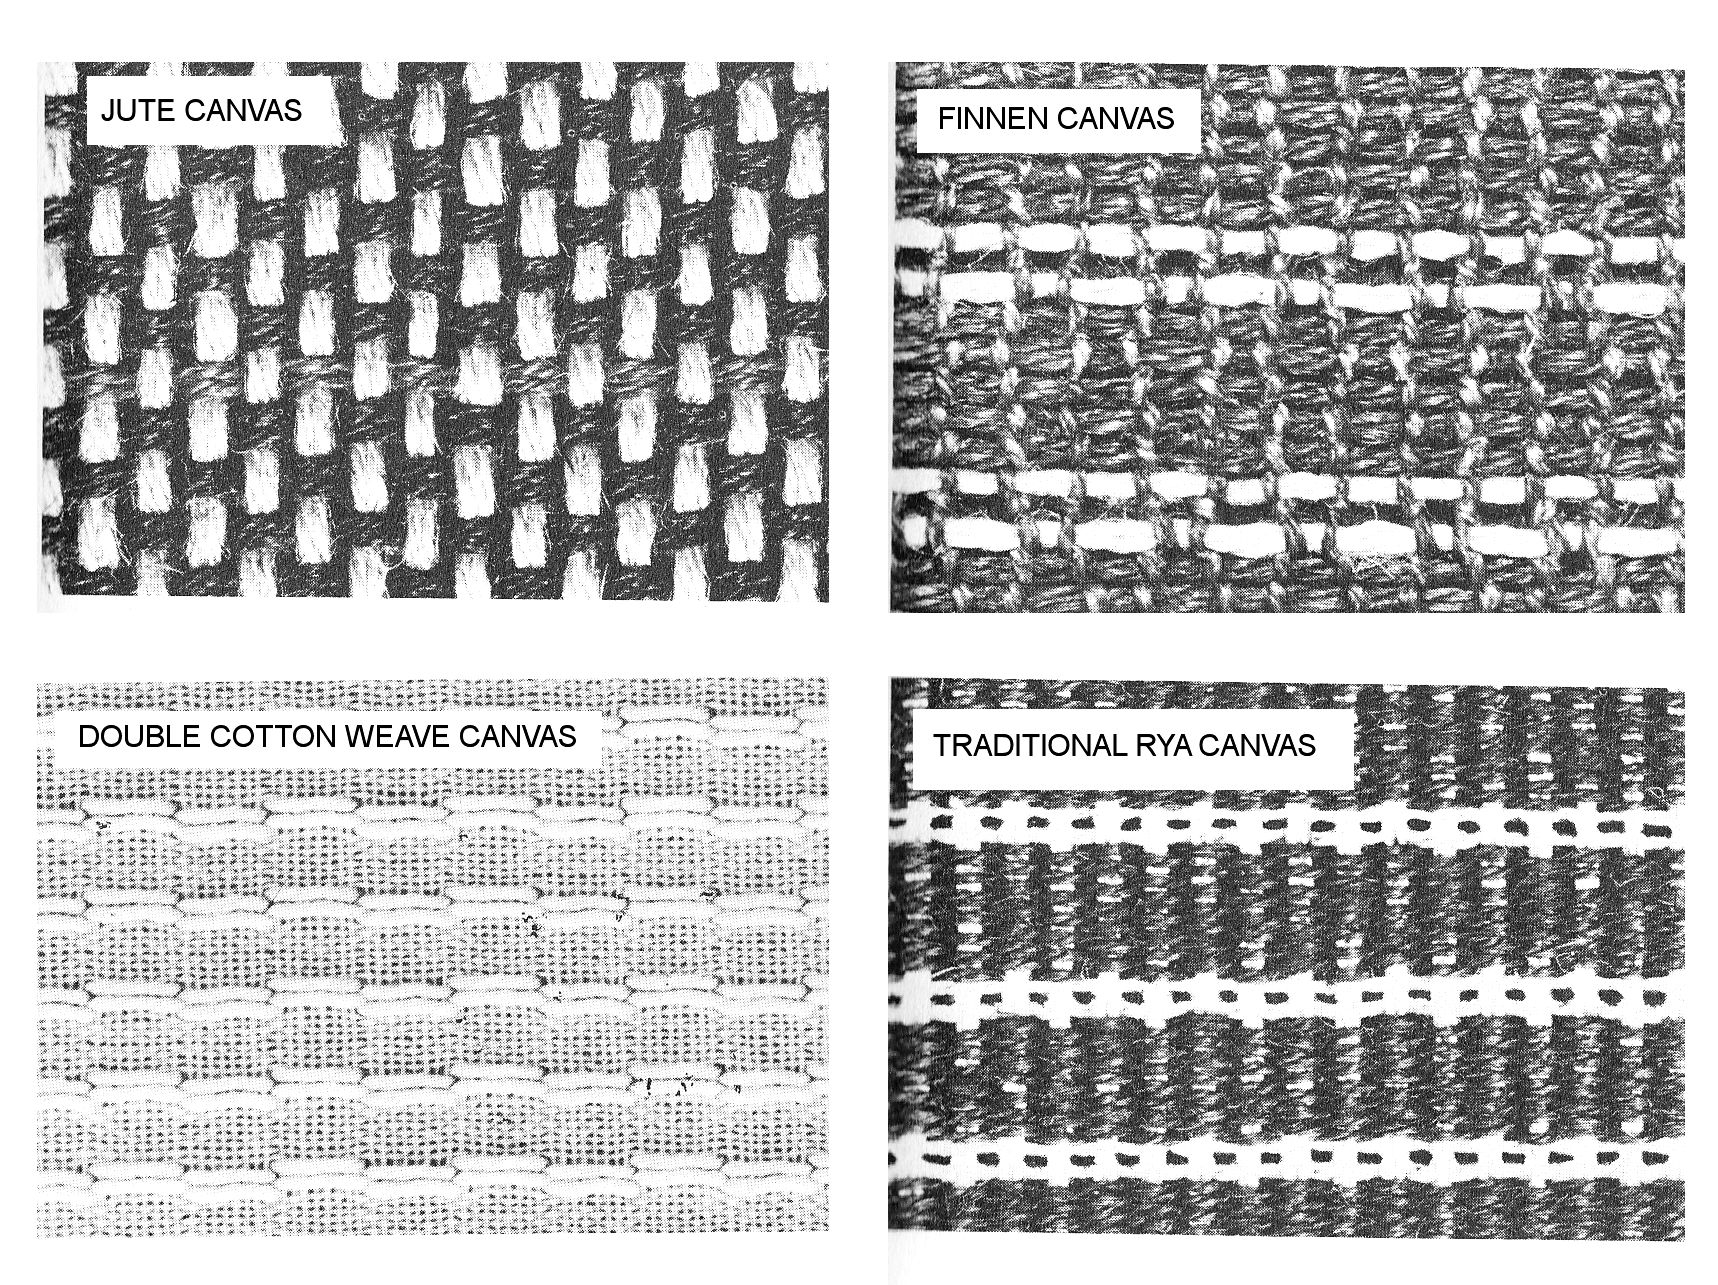
Double Cotton Weave, Jute Canvas, Finnen and Traditional Rya Canvas Compared
Fellow rug-hooking enthusiast Penny Godfrey sent me a sample of what appears to be unstarched canvas. It is net-like and soft, though the scale is the same as starched canvases. It came from a 70 year old lady who used to work at Patons in Darlington at Patons who said the net was used to make the canvas for latch hook rugs. She suggested that it was for putting a pattern on at the factory shed. As more was unrolled from the main roll, it seemed a bit firmer, so Penny thinks most of the roll may have been starched. The unstarched section of canvas looks like it would work with the heavy cable wools that dont pull through the modern canvases. Close examination shows that the weave resembles some of my 1950s canvases which is why I'm guessing that the soft mesh would be heavily starched which would make the threads thicker and hide their texture. It's also possible the factory experimented with different blends of threads as synthetic threads became popular.
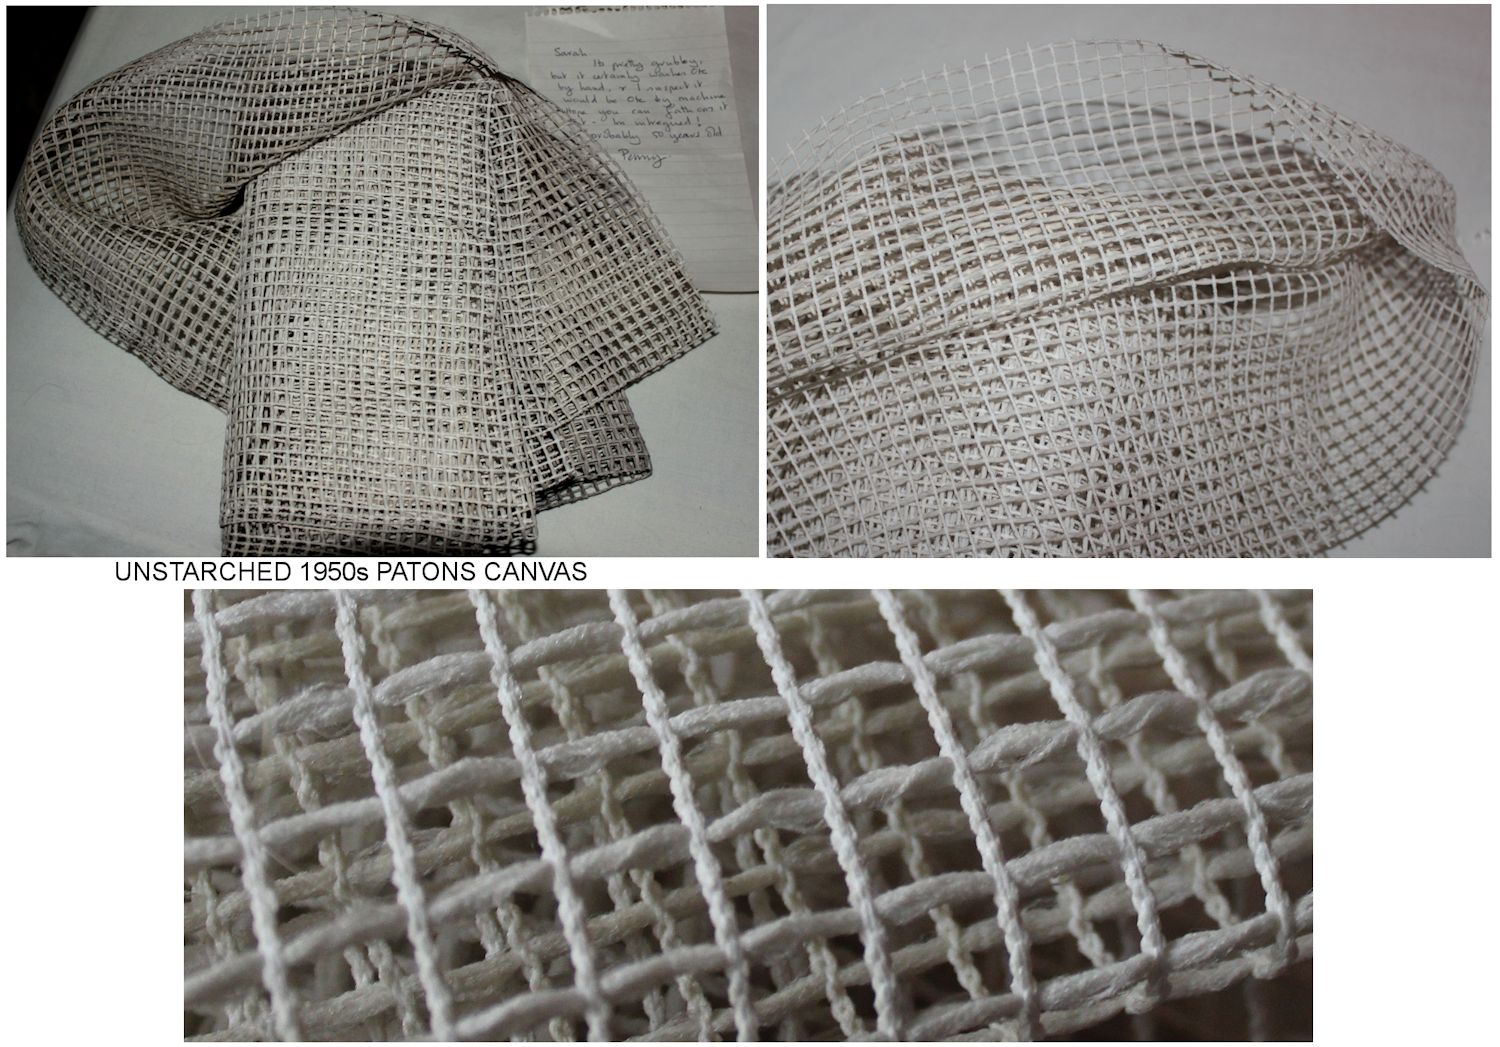
Unstarched canvas
Texere Yarns stock a range of canvases including rya canvas.
Canvases are either sold cut-to-size in kits or bought by the metre from rolls. Plain 3.3 hpi canvas for a decent sized rug is upwards of £20 per metre, so I always keep a lookout for canvases in charity shops. My best buy was about 5 metres of 3.3 hpi canvas for £10; it was very obviously the end of a roll of canvas. Most plain canvases have coloured threads every 10 holes to help keep track of a counted pattern.
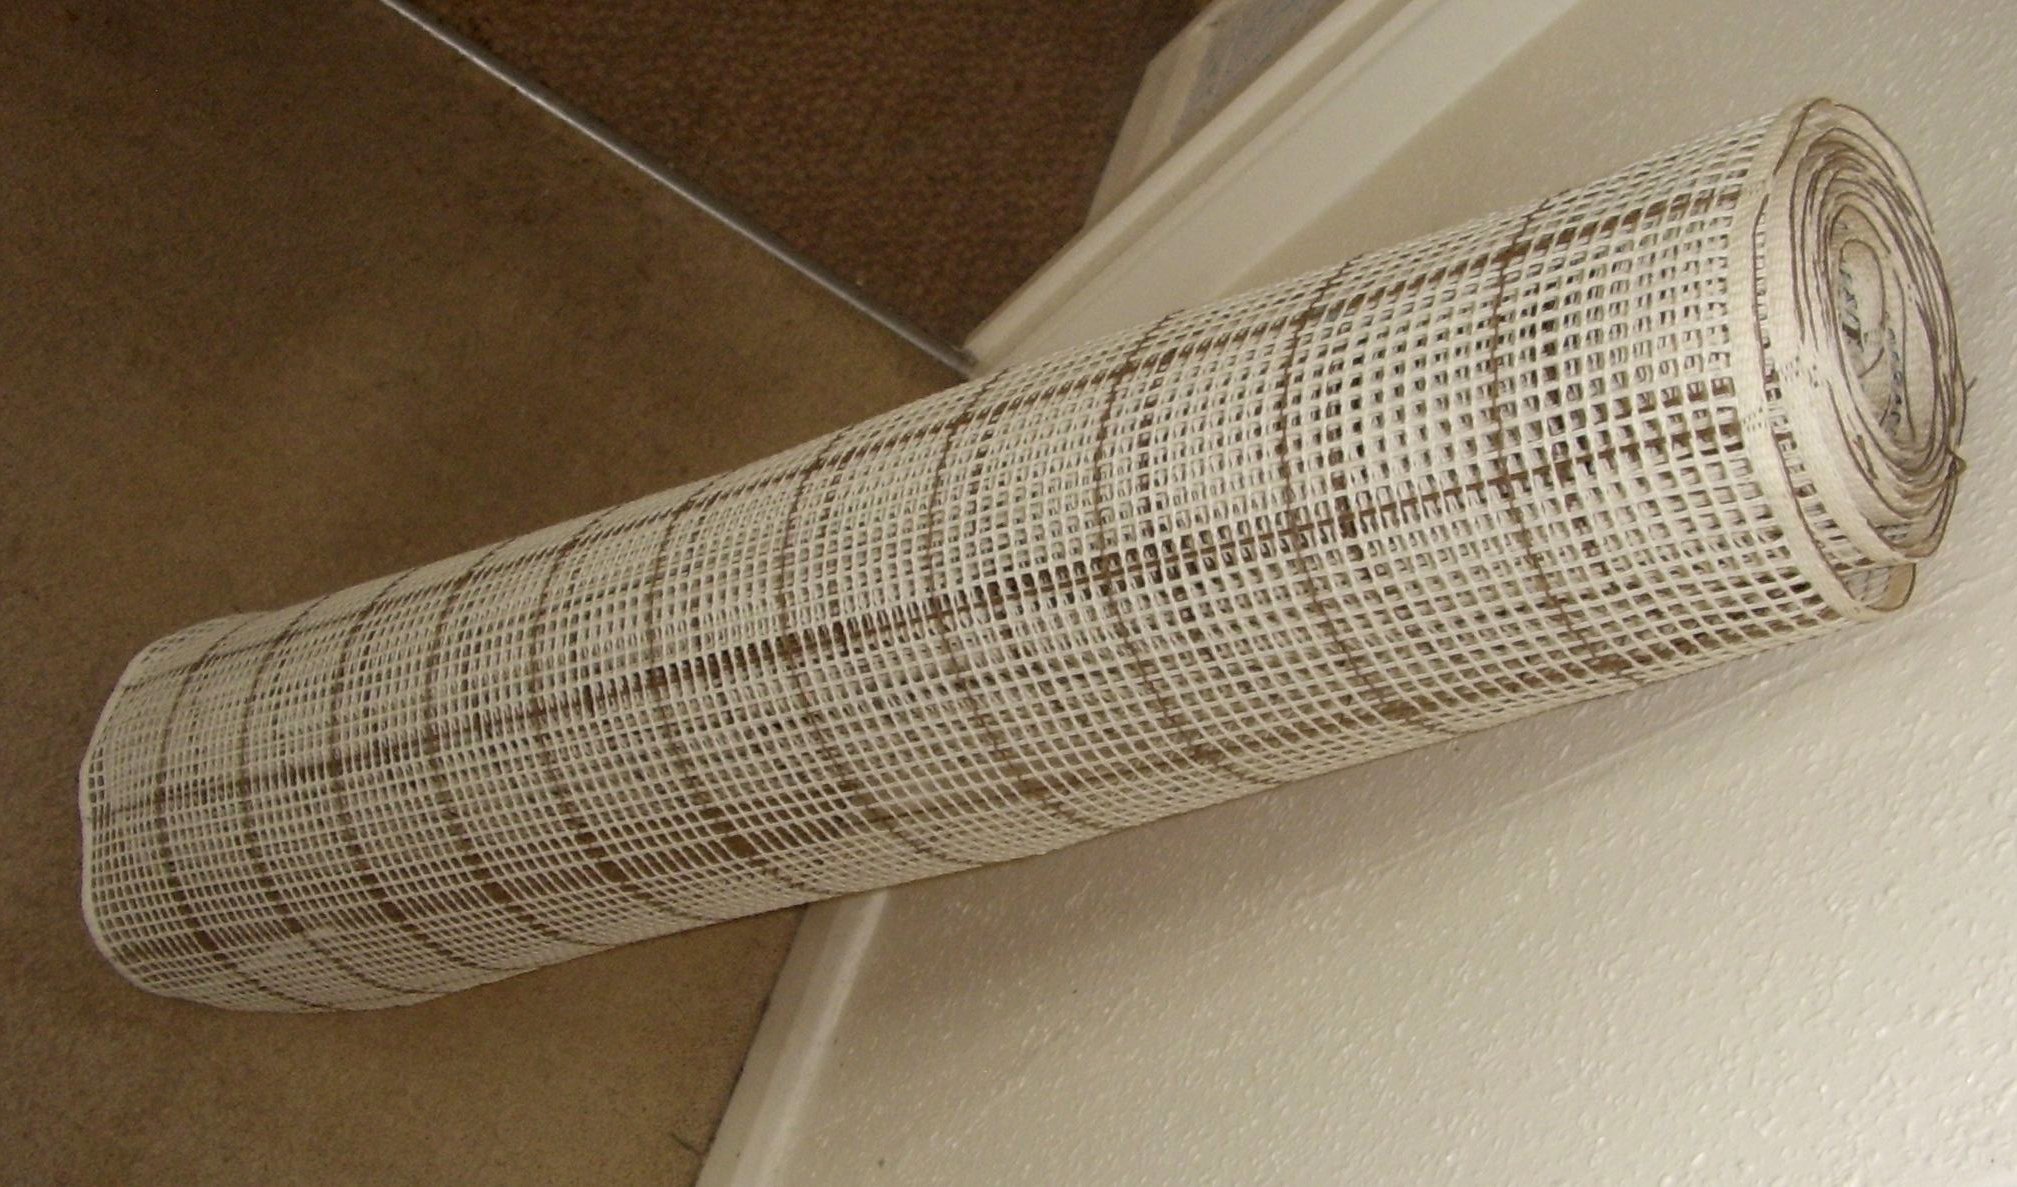
Lucky buy of 4m canvas roll!
KNOT TYPES
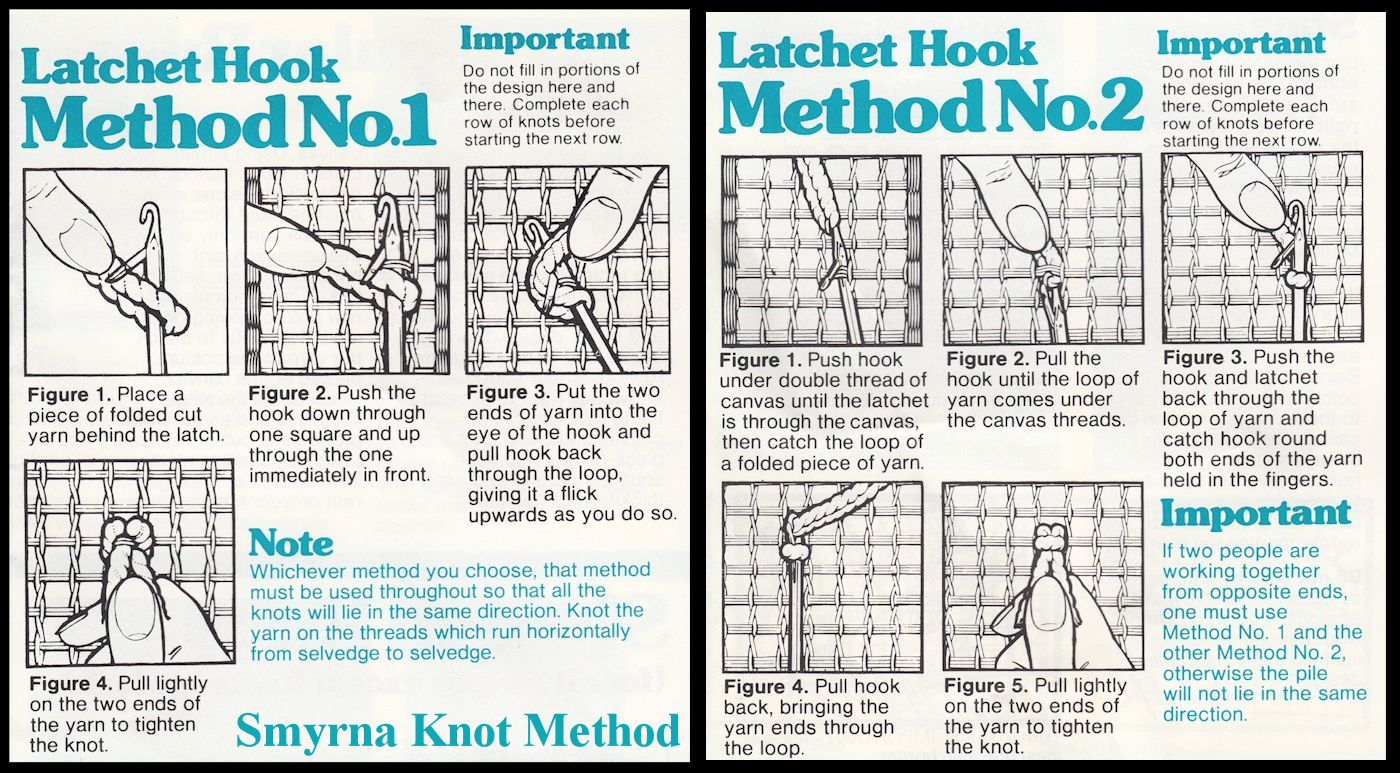
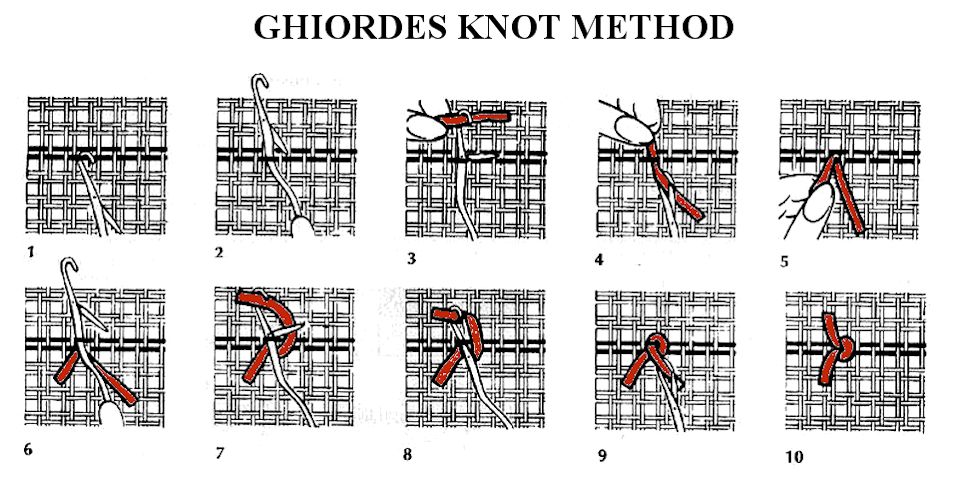
Most latch-hookers will be familiar with the Smyrna knot, even if the name is unfamiliar; this is the knot shown in instruction sheets. I've mentioned the Ghiordes knot in conjunction with 8 hole canvas. Looped and tufted rugs can be made using continuous Ghiordes knots as detailed below.
|
|
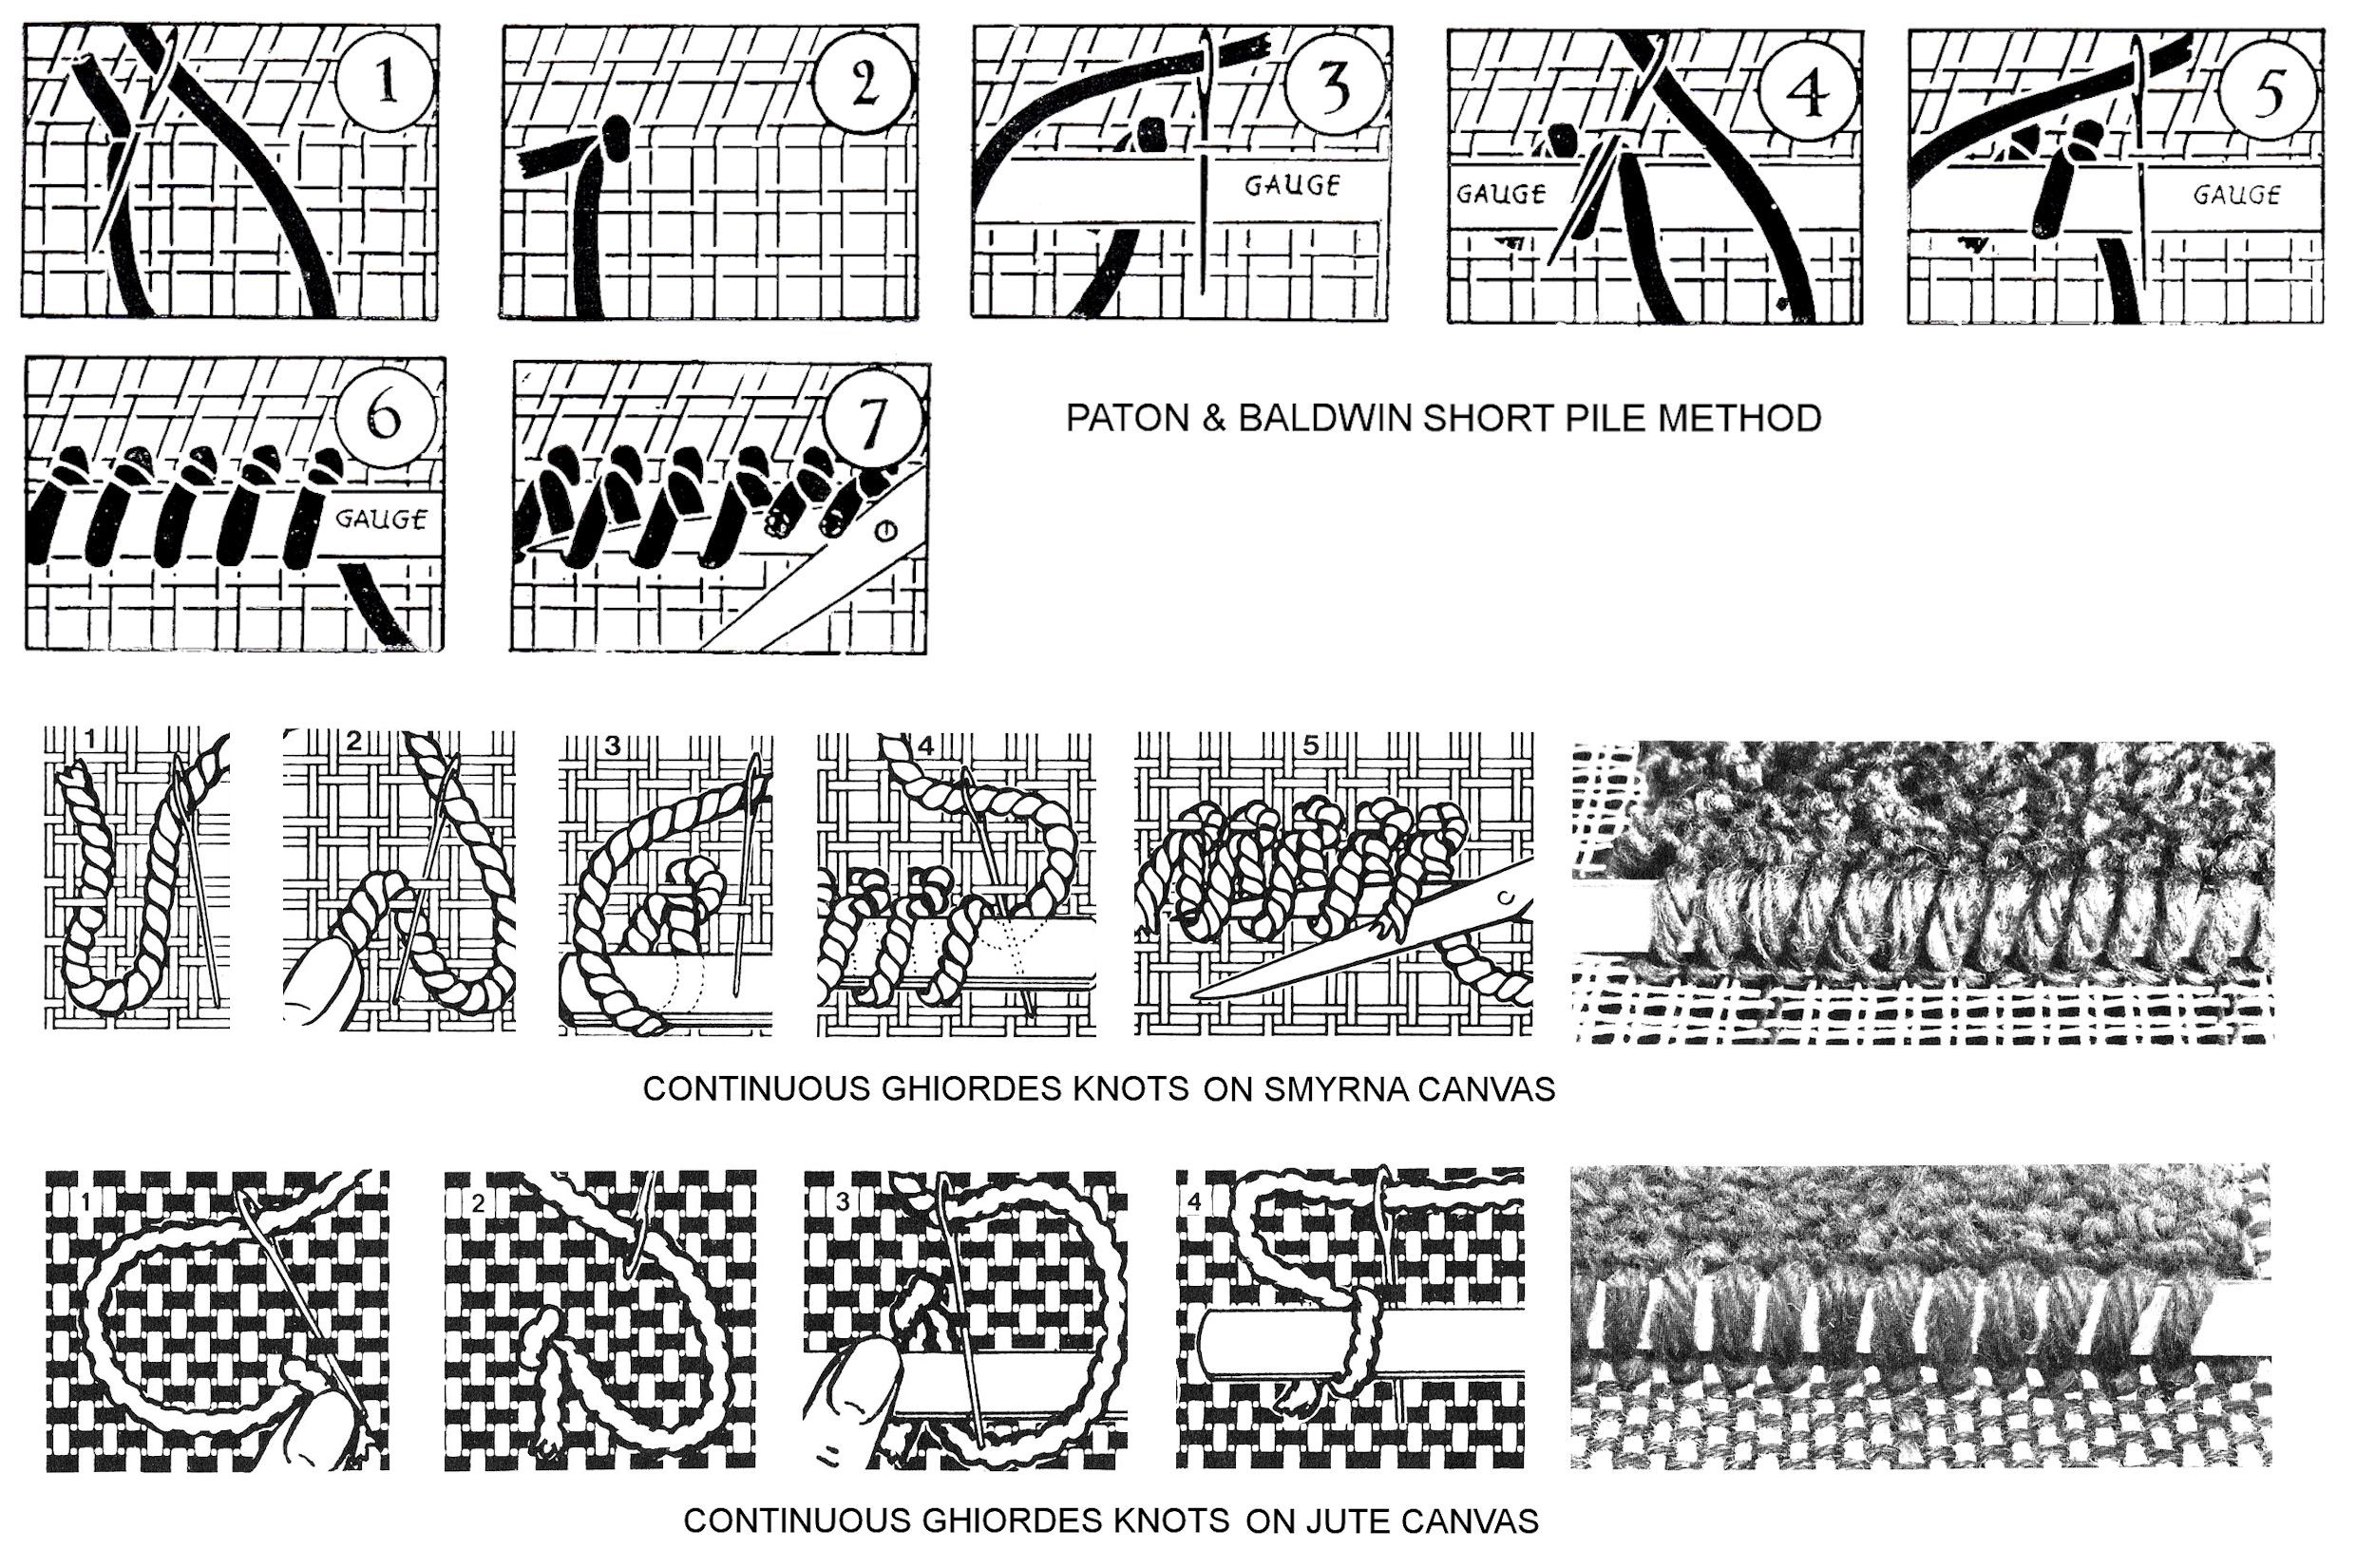
THE SHORT-PILE METHOD (PATON AND BALDWIN INSTRUCTIONS)
The canvas is bent over the edge of the table to facilitate working.
Apart from the actual difference in length of the pile, short-pile and long-pile rugs are very similar in appearance. They vary considerably in the way that they are made, however. The principle of the short-pile method is, by using a convenient continuous length of wool, to make a series of even loops knotted on to the canvas. When sufficient loops have been completed they are cut with scissors and the pile so formed. Loop-making and pile-cutting are continued until the design is finished. Short-pile rugs can be made in either Patons Turkey or Patons Gnome wool. The latter is particularly well suited to this purpose. Being long-fibred, Gnome neither splits nor chafes when pulled through the canvas with a needle and its delicate sheen is most attractive.
TOOLS
These are:—Short-pile needles, short-pile gauge and scissors. The needles resemble packing needles about 2f inches long with a very large eye. You should use one needle for every colour in a design. Short-pile gauges are of wood about f inch wide and 8 inches long. The same kind of needle and gauge is used for Turkey and Gnome short-pile rugs.
WORKING POSITION
This is similar to that described for long-pile rugs except that the row on which you are about to work should lie exactly along the edge of the table.
MAKING THE LOOPS
The diagram shows the different stages clearly. Thread a needle with a convenient length of wool. Begin on the first row of the pattern and work from left to right of the double weft (widthways) threads of canvas. Allow about two inches of unworked canvas for turning. Now insert the needle between the double threads of the first mesh; draw the wool through and leave a free end as long as the gauge is wide (see 1). Hold this end firm and insert the needle just above the double threads, taking care that the loop of wool lies to the right of the needle. Draw the wool through and a knot is made (see 1 and 2). Lay the gauge on the canvas with its upper edge just beneath the knot. Pass the wool under and over the gauge; then insert the needle between the double threads of the next mesh so that the loop of wool lies left of the needle (see 3). Draw the wool snugly around the gauge; insert the needle just above the double threads of the same mesh with the wool lying to the right of the needle (see 4). Draw the wool through once more. This completes a second stitch and makes a secure knot fixing the loop in position which is eventually cut to form two ends of the pile (see 5).
Repeat these stitches along the row (see 6), working the various colours into the design as required. When a length of wool is finished, cut the end so that it is the same length as the width of the gauge.
CUTTING THE PILE
As the rows of loops are worked, the gauge must be moved along. First, however, cut the completed loops evenly with a pair of scissors (see 7). Even cutting saves trimming of uneven ends.
FINISHING OFF
Rub the rug across the surface to work out loose fluff and to “set” the pile. Clip off any long ends with scissors. Turn back the edges of canvas and sew in position.
Continuous rows of Ghiordes knots can be made using a rug needle to work a length of yarn around a woollen gauge. After working each row, slide the wooden gauge out of the loops. Either leave these as loops or carefully cut the loops with scissors to make the tufts.
For knotting on a jute foundation, the black threads need to be parallel to the edge of the table (or run horizontally if you work on a cushion on your lap). First, insert the needle downwards behind a cross-thread, leaving a free end of yarn long enough to go around the gauge. Second, insert the needle to the right and above the first (1). Pull the thread through to lightly form the first knot (2). Place the gauge below the first knot as shown. Insert the needle into the lower row then bring the needle over the gauge (3). Pulling the yarn creates a loop around the gauge. The loop is secured by making a stitch above and to the right, then pass the needle between the canvas and the gauge ready to make the next loop (4). Continue in the same manner until the gauge is full. If the gauge is shorter than the canvas width, you can slide it across. You can either leave the loops uncut to create a loop-pile rug, or cut the loops to create a tufted rug. The width of the gauge determines the length of the pile. This method is suited to shorter pile rugs.
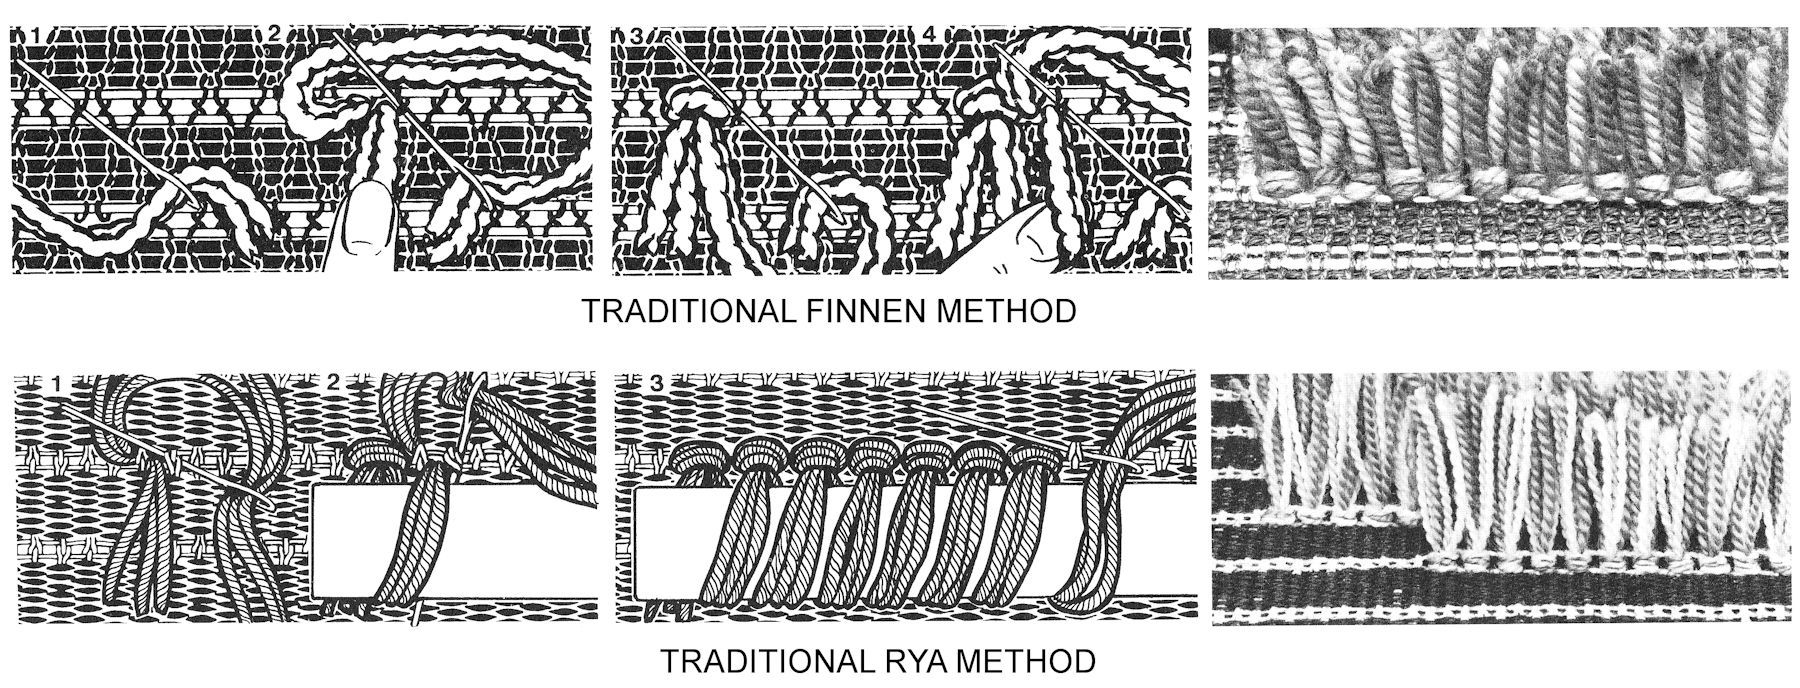
Finnen and Rya rugs are fleecier and longer pile than Smyrna rugs. These types of rug are based on the Scandinavian sheepskin bedcovers (sleeping rugs) of Scandinavia. Finnen rugs use one type of knot, but can use different canvas types. Because these have a long, loose pile, the worked rows are further apart than on latch-hook canvas. Finnen and Rya knots are similar. Knotting is always done in the perforated weft, from selvage to selvage, starting at the bottom left of the canvas several rows from the cut edge.
The Finnen method uses Smyrna rug yarn (e.g. Sirdar), often with 2 strands of yarn in the needle. The strand can be the same colour or different colours. When working Finnen rugs, the weft of the canvas is either horizontal or perpendicular to the table edge. With the traditional Rya method, the weft of the canvas is always horizontal. Rya knotting uses thin Rya yarn with 3 or 4 strands threaded through the needle. The strands can be the same colour or a mix. Modern Rya knotting uses Rya canvas and pre-cut yarn worked with a latch hook. Rya rugs can also be made on standard 3.3/3.75 hpi canvas by working alternate rows only. With 3.3/3.75 hpi canvas it's also possible to work alternate rows in different yarn lengths (long-short-long-short) to give a denser, more resilient pile for a floor rug.
Each Finnen knot takes up 2 crosses of the canvas. First insert the needle from the right, and leave a free end of yarn about 1.5 inches long. Hold these ends downwards with your thumb and push the needle from the right under the next cross, with the strands lying at the top (2). Pull the strands through to create the first knot. Insert the needle under the next cross from the right so that the strands hang downwards (3). Pull the strands through to create a loop 1.5 inches long and hold this down with your thumb while you create the next knot and loop in the same manner. At the end of the row, cut the loops. The traditional Rya method is similar to the Finnen method, but uses a gauge to create even loops. After making the first knot, lay the gauge on the canvas. The upward stitch is wound on top of the gauge, the downward stitch passes behind the gauge as shown. Alternatively, use two or three fingers of your free hand instead of a gauge. Rya loops need not be uniform in size.
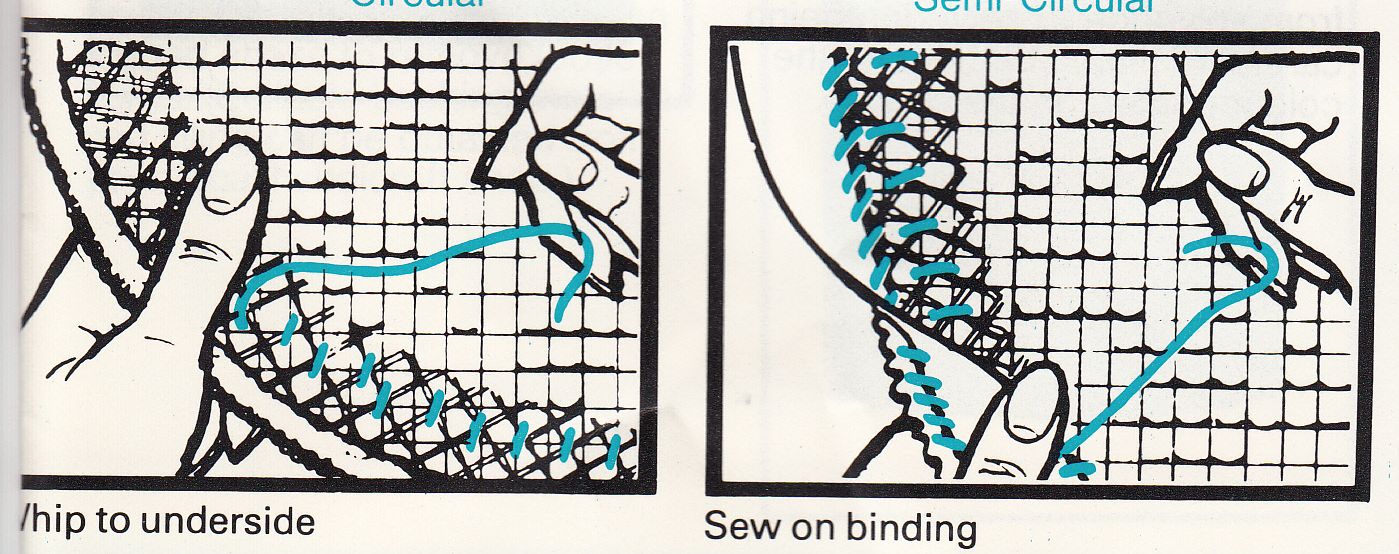
HEM OR TURN EDGES?
I prefer to turn the edges of rugs, making sure there I’ve turned enough that it won’t readily fray. Too many of the modern rug kits scrimp on canvas and tell you to bind the edge, but don’t provide a wide enough binding to prevent fraying. Alternatively, I use uncut yarn as an edge binding on these kits. With round rugs, half-moons and octagonal rugs, some degree of edge binding is inevitable. Don’t cut the canvass to close to the edge of the worked area; I’ve found it better to fold the canvas over and then bind it or over-stitch it.
The Readicut instruction leaflet says to turn edges or odd-shaped rugs, whip (stitch) them to the rug and then hem.
YARN TYPES
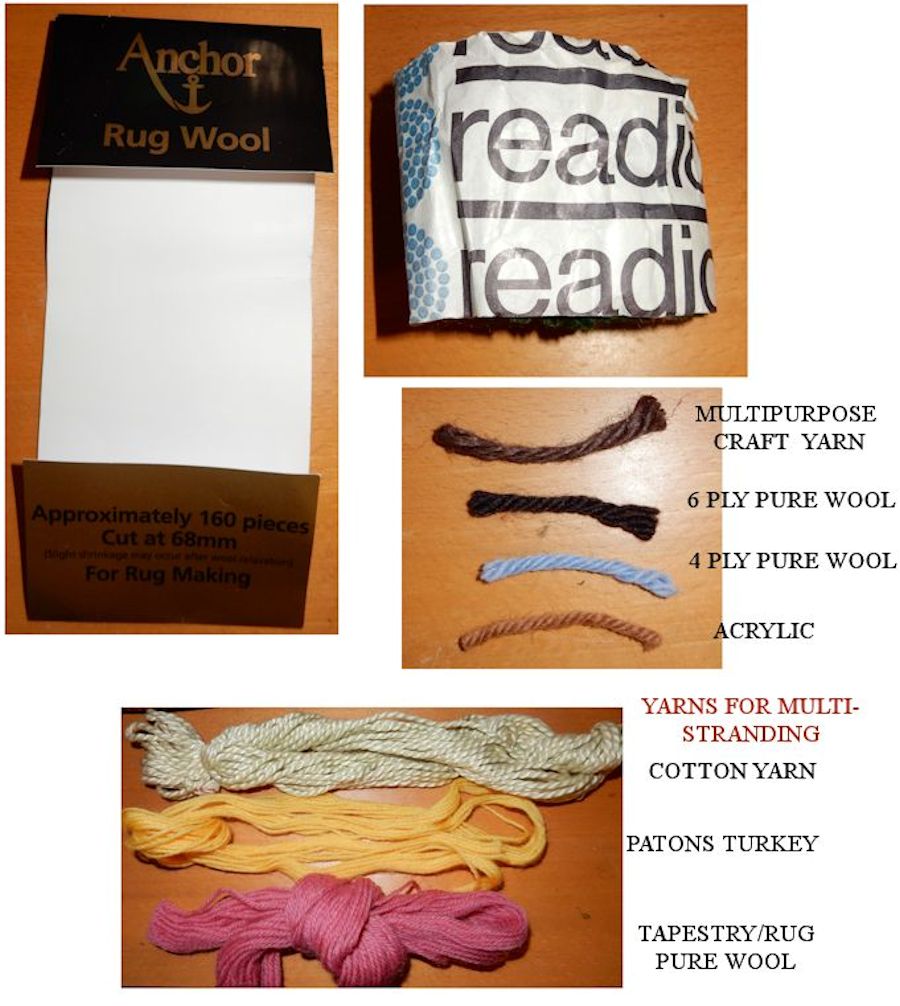
I am very biased. I find pure wool nicest to work with and it gives a clearer pattern. I currently buy my pure wool pre-cut from Iriss.co.uk. Many of my Readicut rugs came with a pre-cut packs of wool acrylic mix. This has a harsher feel as it wears. Depending on era, the Readicut packs that turn up in second-hand shops may be wool, or wool/acrylic mix. With regard to mixes in general, they range from about 20% acrylic to 45% acrylic and as the percentage of acrylic increases, the more the rug pattern loses definition. I've made a couple of acrylic yarn rugs (completed for other people), but the colours were too bright, the pattern looked fuzzy and the pile wasn't as plush as the wool or wool-mix yarns. Because of this, I always use two acrylic strands together when working with 3.3 holes/in canvases (my "using up odds and ends" rugs). Acrylic yarns tend to go harsh or brittle if exposed to hot sunlight for long periods of time.
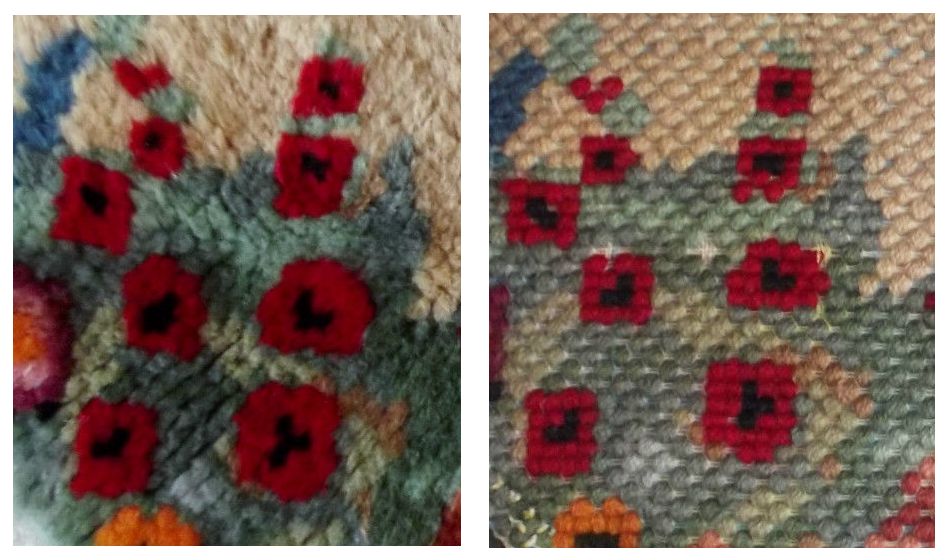
Cable Wool is a much thicker type of wool for producing chunky rugs. Using alternate holes of a 3.3 hpi canvas gives the equivalent of a 1.65 hpi canvas. I’ve used 8 ply acrylic yarn and I know from that experience that very thick yarn is not easy to latch hook on a standard 3.3 hpi canvas. Below shows a section of the front and back of a design worked in cable wool. I have seen vintage pieces of canvas that are honeycomb rather than square holes and I assume they were made specifically for use with cable wool.
As well as rug yarn, oddments can be used. Being a “make do and mend” sort of person, I’ve made doormat rugs out of wool reclaimed from old knitwear. I've also used odds and ends of knitting yarns, again pure wool or 80%-90% wool mix. The best one, I found, was Aran wool as it provided a good texture. I pick these up in charity shops and boot fairs.
I've used tapestry wools (6 strands per knot) as bags of these turn up at boot fairs quite cheaply. These are useful for working small areas of colour where I wanted to use lots of colours without having lots of leftover rug wool. The Anchor tapestry wools also come in colours compatible with Anchor rug wools. Tapestry wools are great if you have designed a rug where you need just a few tufts of a particular colour to add definition to a feature. In 2013, I picked up a job lot of "craft wool" (skeins of light brown and white) that was for macramé and “suitable for rugs and other crafts”. This was a thick 8-stranded acrylic yarn and for my 3.3 holes/inch rug I cut it to a slightly long length (it doesn’t know so well) length and peeled it to 6 strands (which also made it go further). The pile is good, though the pattern is quite fuzzy and I'm keeping the rug away from direct sunlight to prevent the yarn from going brittle.